Category Archives: Taking Pictures

Taking photographs with the iPhone

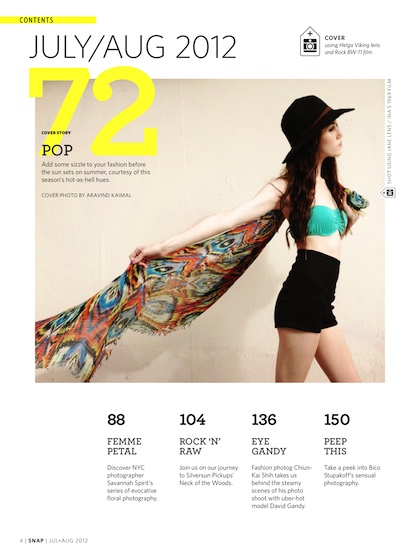
iPhone Hipstamatic fans… Latest version of Hipstamatic Snap Magazine for the iPad is available

Over a month ago, the folks that developed the Hipstamatic iPhone Camera app produced ‘Snap‘. An electronic magazine of photos and stories of very creative Hipstamatic using photographers. Sadly, the Newsstand on the iPhone doesn’t seem to find it to load, so the FREE magazine Snap is for the iPad only.

Each issue has many photos taken using the Hipstamatic app using the many films, filters and flashes available. The photos can be touched for more information regarding which of the many options was used to get the image as it appears in the magazine pages. There is also stories about photographers and their lives. Any subject can and is being covered so some coworkers may take offense, you may want view away from the crowds prior to doing flipping the pages in a crowd. That said, the photography is amazing. Snap does a great job of showing what can be done using the different options in Hipstamatic.

Automating the sharing of iPhone photos amongst friends at the same event

There has been quite a few apps claiming they are going to make it easy to see events from many angles. Using ‘friends’, merging photos together into some sort of viewable group. Most have been strong on one or two features but not providing a complete solution. The other end of the solution is apps that track every move of you and your friends to encourage sharing… that is just plain creepy!!

I was disappointed with a couple options that let you share pictures if you knew in advance who was going to be there, request and they accepted your invite to a shared area, etc… Usually those people are standing right next to me at the event so what does the share do for me?!

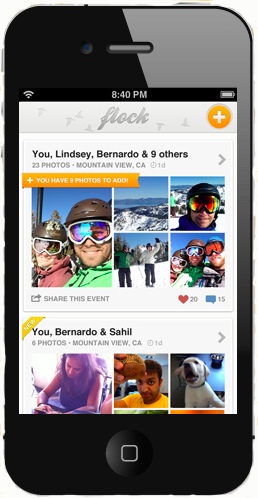
The folks that do the Bump app, which handles transferring contacts and photos by bumping iPhones, are now taking a crack at filling the need for friend event photo sharing. The app, Flock, is an iPhone app that pulls together pictures your friends took at an event and puts them in a shared album.

The info on Flock states that you can use any app to take the pictures with, so it would appear it uses the EXIF info for time/location rather than having to do it’s own unique ID. The app does require you use your Facebook login as it’s login. Normally, this is just a way of letting Facebook handle the security of logins, but in this case it is how Flock knows who your ‘friends’ are.

When first launching Flock, your asked to allow the app to use Location Services. Like Bump, this means you have the location icon showing all of the time. With some apps, your battery goes down much quicker when something is constantly pinging the location, but Bump claims their apps are better at it and shouldn’t have a negative impact. The apps need to know your location in order to judge it against other users location. In the case of the Bump app, so you can transfer files, in the case of Flock so it knows when multiple users are at the same event.

Knowing where your at, that there are photos tagged with the time and location of the location, who your Facebook friends are, and if they were at the same location taking pictures, an album is created for you. Flock works in reverse too so if an event you took pictures at was also attended by a Facebook friend of yours, a push notification will let you know an album will be created from that event too. Of course, this does mean all of that information is sitting on a company’s servers to make the connection. How much of my every move being tracked by someone is worth the convenience of having a group photo album be created? Tough question that every individual has to answer for themselves.

It would be nice if something could be done with the collection of photos, Flock Album outside of just viewing in the app and relying on Flock to get your viewing pleasure right. A couple important positives… your photos are not shared with your friend’s Flock albums without you OKing it and they are not posted to Facebook automatically either (sharing a photo can not be undone though).
MPro, the highly adjustable Black and White iPhone Camera

Over last weekend at the park I was playing with the Black and White camera apps I covered earlier. The limitation is only the lack of color, which means a different kind of creative, not ‘more’ creative. When talking with others about shooting black and white, I get a lot of folks saying they need to research what they have to do differently. Depth, contrast… important things to think about when playing. The beauty of digital is we get to play a lot. And of course we know right away what an adjustment did, no waiting for film to be developed.

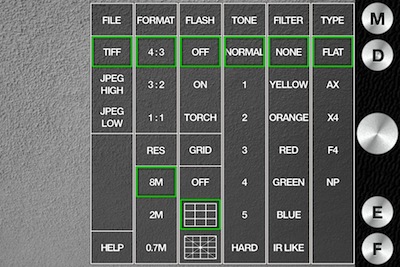
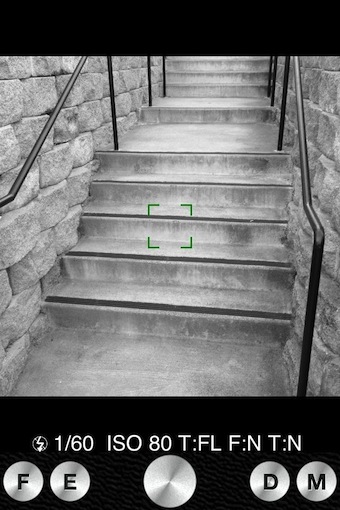
A new app in my Black and White iPhone camera collection is MPro. This is not a filter or image enhancement app. Your iPhone viewfinder shows what the resulting image will be. MPro offers a lot of options for how the iPhone camera will take the photo. Tap the ‘M’ button to access the many setting options.

The MPro app likes being used in the landscape view, but portrait is also supported. Your setting choices are shown on the screen as a reminder of what your shooting. Talking a picture is quick, but MPro crunches on the photo for a while before dropping it into your iPhone’s photo library.

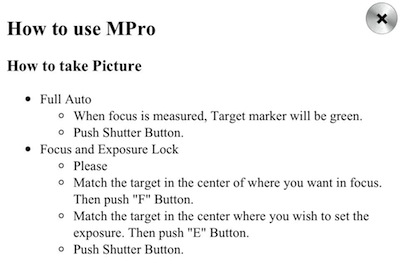
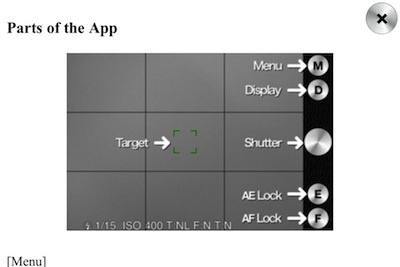
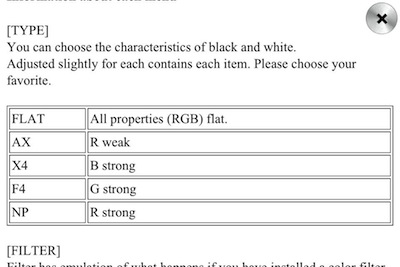
The first time you launch MPro, a ‘How To’ manual pops up. I of course closed it right away to get to the camera fun time. Then found I needed more info about the many setting options. To get back to the ‘manual’, tap the ‘M’ button where the settings are, down in the corner is the ‘Help’ button. Below are the important highlights of the manual that you will want to review for better image results.

The simple interface allows the act of taking the pictures uninterrupted.

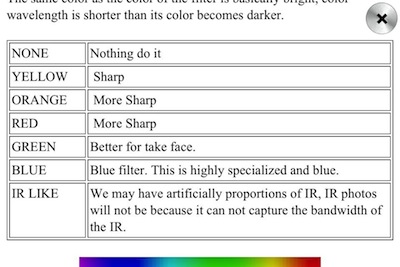
As you scroll down through the help file, you will see more details for all of the adjustment options MPro offers. The information is a lot of help when looking at a image and trying to understand what tuning you may want to do to get the impact you where hoping for.

The ‘color’ choice options make a lot more sense with a bit of help about how they relate to wavelengths into the iPhone camera. MPro has the kind of options that need to be tried to really understand the impact of each.

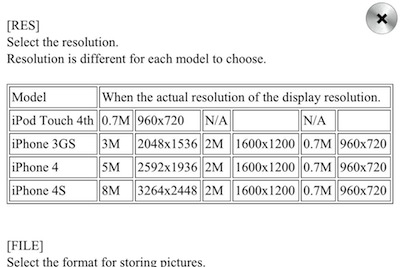
A nice quick reference resolution chart is included for the latest Touch and three most recent iPhones.

iPhone effects and the manual photo creations of Ben Heine

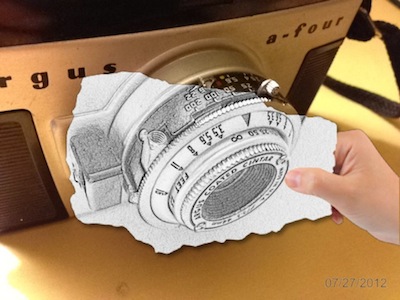
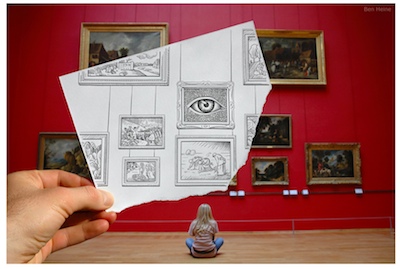
A few months ago, I mentioned a iPhone specialized effects app called PowerCam ( Those fun iPhone Photo Effects using PowerCam ). Real time view finder application of the filters means you get what you see when you hit the shutter button. While the app offers many effects and photo enhancements, the one I always go back to PowerCam for is the Pencil over Photo images.

Yesterday, I came across the work of Ben Heine via his Web site. He does similar work with pencil drawings held up over an area to photograph. Not automated like PowerCam, you will notice the similarities though.

As you look around Ben’s site, you will see how he draws the paper art bits to hold up. Then, what you may have missed in the photo above, it becomes obvious that Ben is adding things to the area that isn’t there. Like below, in the actual background area of the dog, there was no cat. He has done some very creative Paper Sketch over Photo images like standing on top of a building when actually on the street and seeing through someone down to their skeleton.

The Ben Heine site is much more than these effects. If you need to look through an increadible portfolio for ideas or looking to add to you collection, spend some time here.


Before and after photography with the iPhone and Photo Time Machine

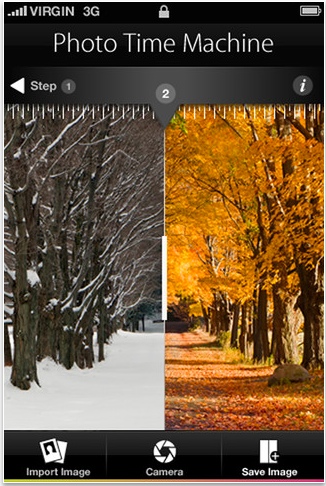
Not long ago, I covered some uses for PhotoRemake Pro (Interesting app for photographing historical landmarks using the iPhone), an app that let you superimpose a image over the iPhone camera viewfinder when taking a photo. Today, I found an app that takes that idea a step further. Photo Time Machine on the iPhone acts as a specialty Before-and-After photography tool. Using an image you take or import, bring it up on your iPhone screen and looking through it, resize to match the current area. When they match, snap your photo. This will be great for some old pics we have of the house back when it was first built to compare to how it is now.

The Photo Time Machine will be great for recording an area through season changes. Or, a real estate agent can show the same room with/without furniture. Oh… how about a building at different times of the day? OK, the ideas are starting to sound fun… how about before / after a haircut?

ProCam iPhone Camera app with the Unique User Interface

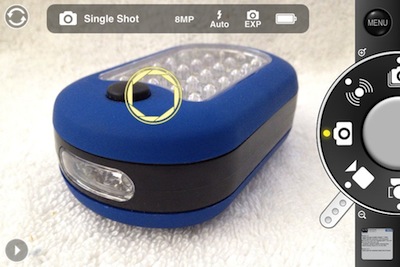
When I say ‘unique’, I’m talking about unique on the iPhone. The ProCam interface may actually look familiar to many digital camera users as the camera app mimics real world buttons. But, with settings and adjustments that I wish my digital camera had.

The feature list is pretty familiar for most iPhone Camera apps:

– Full focus and exposure control (touch focus / touch exposure)
– White Balance lock
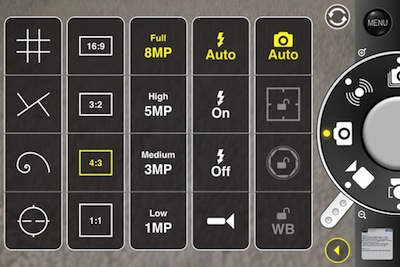
– Adjustable image resolution (Full / High / Medium / Low)
– Adjustable aspect ratio (4:3 / 3:2 / 16:9 / 1:1)
– Adjustable JPEG compression quality (100% / 90% / 80%)
– Adjustable video resolution (Full HD: 1080p / HD:720p / VGA: 640×480 / Low:480×360)
– 6x digital zoom
– Geo location tagging
– Alignment grids (Thirds / Trisec / Golden / Horizon)
– Front / Back camera support
– Flash settings (Auto / On / Off / Torch)

The user interface for ProCam, while very un-iPhone like, looking more like a physical camera, makes it easy to change settings quickly. When I’m doing street photography, I usually have to choose a setting and shoot for the better part of the day with it. Many ‘camera’ settings are offered in the popular app solutions, but every change are a couple taps deep. With ProCam, everything can be done with one tap or a twist of a virtual nob.

When viewing your subject, the dial on the right twists to change the ‘camera’ set up:

– Single Shot
– Anti-Shake with adjustable sensitivity (High / Medium / Low)
– Burst mode with adjustable image quality (Full / VGA)
– Self-Timer
– Interval
– Face Detection
– Big Button
– Video

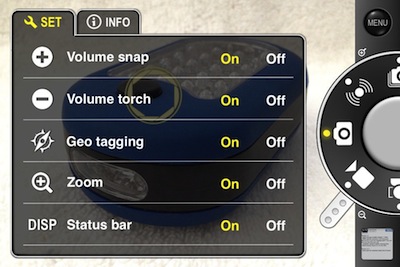
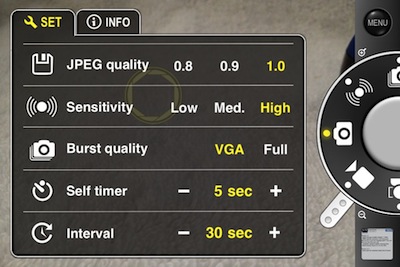
The small tab out of the ‘dial’ is used for controlling the 6x zoom. Choose the arrow button on the lower left corner to expose the specifics on how you want your iPhone’s camera to work via ProCam. Tap the options to change, the single window makes it easy to change while on the go to get a specific shot quickly.

There is also several screens worth of fine tuning all of the features via the Menu button (upper right). ProCam keeps the settings simple and quick too with a tap to change On/Off or quick chooser showing in a single view rather than having to drill down for every adjustable line item.


Interesting app for photographing historical landmarks using the iPhone

When on photo walks, I come across buildings and landmarks that I recognize from photos taken by others. Generally, the photos are memorable. Sometimes it is fun to get a photo of the area as close to the more famous photo as possible for people to relate to the impact.

There are also times that I will be taking a photo of an area as I pass it, day after day, capturing a series of photos to show the changes over a period of time. For this, I try to find a non-changing location ID that I can use to stand on or at when taking the photo.

Both situations may have gotten some help with an app I just stumbled upon called PhotoRemake Pro. The app is a couple dollars so it won’t be a no-brainer free download, but it really solves several problems so it can pay for it’s self pretty quickly is curing headaches.

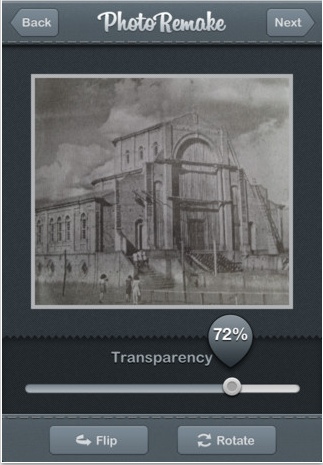
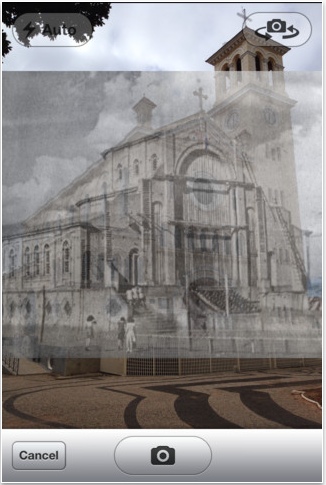
The app is simply a super imposing solution where you use the historical photo or a photo you took previously as an alignment tool. With the image showing in PhotoRemake Pro, you adjust the transparency till you can see through the precious picture to a live view for alignment. Then, snap the photo. There is no filtering or trick enhancements done through the app, it is just for getting the shot to align with a previously taken photo. Simple, but an effective way of lowing the amount of alignment editing needed later.

Creating collages on the iPhone for Instagram using InstaCollage Pro

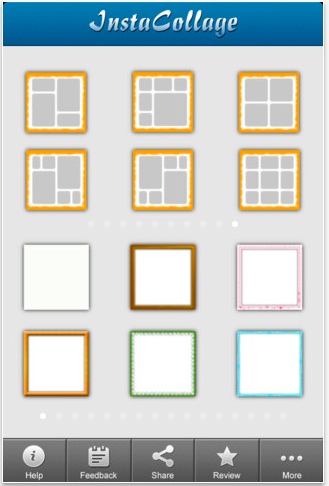
I have commented here a few framing and collage apps, generally referring to them as creators of  multi photo ‘images’. A new addition to the group (new to me) is InstaCollage. The iPhone app has the features of the many collage apps in the iTunes store, but tuned a bit more towards folks posting to Instagram. Pick a border/frame/template layout that matches the group of photos that you see being together to deliver the message.

It would be too easy to create a post that seemed endless if I try to cover all of the features. You choose a image layout, place images, resize, shake to remove all of them, add a frame, adjust backgrounds, adjust the round corners around the images, frame texture/thickness… Add stamps, text (more than 50 fonts), change style and adjust images with a variety of filters. While InstaCollage appears to be made for posting directly to Instagram, you can also post to Facebook, Twitter, attach to an email, or save to your iPhone’s photo library. For the more creative, there are collage options now where the images are shapes beyond simple squares too!

Get the Photographer in the shot with Signature Camera Pro on the iPhone

If your at an event and taking pictures, how do you include yourself in the photos? Do you use the front camera so you can see everyone and you on the screen? Of course, this means the overall photo is slightly lower resolution as the front camera is not as high a number as the main/back camera. If you use the ‘main’ iPhone camera, you have to guess who may be cut off in the final photo.

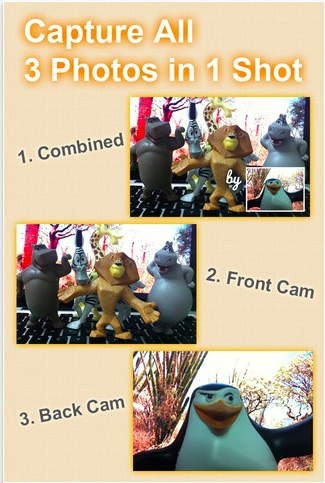
Another option I came across today is Signature Camera Pro. It works by inserting a photo of the person taking the picture which it takes when the main photo is taken with the higher resolution camera. Signature Camera Pro actually produces three photos: one of the group, one of the photographer and one with the two merged together.

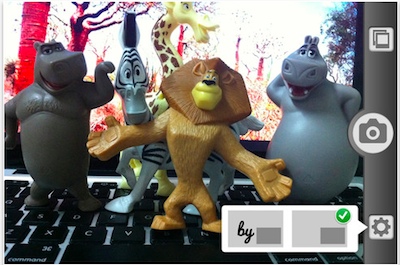
When snapping the photo using Signature Camera Pro, you are able to choose if you want the photographer’s image as just the thumbnail insert or the same photo with a ‘by’ next to it. There is also the option to choose an image from your iPhone’s photo library… not sure if this photo is used as the main or thumbnail photos as the feature isn’t working on my (and three of my friends) iPhone.

iPhone Black and White Photography has gotten better with Hueless

Show of hands, how many readers remember my mentioning an app I have been using (reviewed) for Black and White photography with the iPhone. The important part to the joy of taking the Black and White photos was that the shots are done from the start without color rather than running filters later.

A downside I mentioned was that the ‘viewfinder’ on the iPhone screen showed the subject in color, with the resulting image being Black and White. So, your not seeing what you will get, must like looking through a film camera’s physical view finder.

A iPhone Camera app I just found that solves my request for ‘see what you will get’ viewing is Hueless. The app has it’s positives and negatives, but as a app for seeing and taking Black and White photos with my iPhone, it’s a winner!

When you launch Hueless, your ready to start snapping shots. Tapping the screen will give you a focus ring. Around the outer edge of the screen (works in portrait and landscape views) is some tuning options, which can be hidden if you want a clean viewfinder screen. The screen shot below is all of the tuning options showing. The ‘half circle’ can be tapped to run through colors like yellow and green filters, this helps when dealing with a color item you want parts to show strong or week. Next is the ‘show grid’, front/back camera chooser and flash control. Down the left is a slider for tuning the exposure. The only complaint is that front/back camera choose, why wasn’t the iPhone’s standard icon art get used?

When you snap a photo, they are saved to the ‘camera’ roll graphic along the bottom of the page. Tapping the image, opens a new page, the app thinks a bit then your given a screen with three icons: A camera icon to return to photo taking, a Photo Library link to see the images to choose, and a share button to share images with friends on Instagram, Twitter and attach to an email.

The need to step through the iPhone’s photo library confuses me, but the process of taking the picture from the start makes Hueless a fun app I will be using a lot.