Tag Archives: photo share

Pulling together pictures that tell you about a place before you get there

Photo sharing sites have become a place for people to post photos showing what they had for lunch, the people they are hanging out with, a funny situation and a place they are visiting. While browsing around places like Instagram or Twitter, it is possible to see photos from places I have never been to. Many places are locations that I will never be able to see in person. There are other photos of places I am about to visit. The difficulty is pulling together places I’m heading to beyond doing a simple search.

A solution has shown up as a free app to use on the iPhone, called ‘Now.‘ <- there is a period in the name. The app will give you the option of viewing around you, a key city or search for another place of interest.

01 Now iPhone

The Now. location images shown appear to do not be by hashtag, rather Geotags. So, looking for a location on the map will give you photos that others have taken in that area. Unlike searching directly on Instagram where your dependent on people getting their hashtag assigned and spelled correctly.

02a Now iPhone

One instance of using Now. beyond sight seeing is an event like Macworld. Going to where the event will be or searching for the particular event by name will present all of the images posted in the area.

02b Now iPhone

The images can be scrolled through as thumbnails as well viewed larger end-to-end. The group and individual photos can be favored or shared.

03 Now iPhone

The Now. app lets you tell others about a photo (like in the case of Macworld, group photos your friends might be interested in) or to tell the system that the photo is Inappropriate.

04 Now iPhone

Choosing a picture will let you pull up the full size version. This is nice to view people, what other people have seen at the location, and in the case of a restaurant, a view of a dish you may want to order when there.

05 Now iPhone

Send a photo to a friend with the iPhone that can only be viewed for seconds

The Poke feature of Facebook has been around since near the start of Facebook. You can ‘poke’ someone like a tap on their shoulder as you walk down the hall. They have shared a brief second with you and time moves on. Why, well… not sure beyond letting someone know your thinking about them.

An app, ‘Snapchat’ took that a step further by letting you remind them that your thinking of them with a photo. Instead of just sending a text message with a photo attached, you can use the app which will limit the length of time the photo will be viewable. Perhaps it could be used to show someone a interesting thing that is happening without worrying about the photo being shared or cluttering up the recipient’s iPhone photo library.

Facebook has taken their Poke feature and made it into a free iPhone app now. You can choose to ‘poke’ someone, you can send them a photo, a bit of text or even a short video. All will be viewable for the receiving person (Facebook contact) for how long you allow and then go away.

01 Facebook Poke

After you choose the type of ‘Poke’ you wish to send, like the photo below, you can do a little tuning and set how long the photo will be viewable to the person your sending it to. When you tap ‘Next’, you are presented with a lit of folks your connected to on Facebook allowing for one or many to be chosen. After you send, the Poke and who you sent it to is added to your list of ‘sent’. The list can be cleared if you do not want the history kept.

02 Facebook Poke

But, if someone was fast when their view a photo you send them with Poke, why couldn’t they just take a screen capture of the image. According to the ‘Help’ area, the sender gets a message that a screen capture was snapped. Of course, there are apps that record all actions when an app is open so that wouldn’t register as a screenshot. Also, they could snap a photo of the iPhone screen using a second device so don’t be misguided into sending something that could haunt you later thinking it will go away forever when Poke auto deletes.

03 Facebook Poke

Expanded Instagram iPhone Photo Effects with Instagenius

Most posts to Instagram via the iPhone are quick shots that have one of the Instagram free filters applied. For me, photos usually run through Camera+, Dynamic Light, Snapseed and/or PaintFX prior to upload. These apps are easy to use but are meant for more than simply adding filters to photos.

An app I was recommended to test, Instagenius, is similar to Instagram filter application but there are lot more options. Importing an image, Instagenius starts with giving you adjusting your photos with Effects filters, tuning with Adjust, Crop, Rotate, add a Border/Frames or create a collage (collages are small resolution 612 square).

Selecting Effects results in thumbnail views of the photo with a variety of Instagram level filters applied for quick review.

Just selecting an Effect does not alter the photo. Instagenius presents a preview of how the photo would look using the effect. Swiping left/right moves through the effects. Skip adding an effect through the ‘Cancel’ button or add using ‘Apply’.

The ‘Adjust’ area also launches with thumbnails showing the adjustment applied. The list of options scroll up/down. If there are non you need to use, select the ‘Back’ button in the upper left corner to return to the Instagenius overview screen with the photo untouched.

The filters in the ‘Adjust’ area have sliders to tune the effect impact, select ‘Apply’ when done. Like the ‘Effects’ area, the app takes you back to the thumbnails of adjustments to apply another.

Selecting the ‘Done’ then ‘Instagram’ will launch Instagram with the photo loaded, ready to go through the normal steps. The images uploaded to Instagram are lower resolution than other apps that are less directed at Instagram. So while Instagenius adds more effects, the final image isn’t suited for many other uses.


EyeEm for iPhone goes 3.0 with new UI but stays true to quality over cute

No matter how you like to view and share your photos, there is a service available for you to do it just the way you like. EyeEm is a free social photo share service that I enjoy due to the type of people hanging out on the service. The service attracts photo uploads from folks that are leaning more towards creative photography rather than what they had for lunch. Of course, there is a little of everything, good and bad, but for the most part EyeEm attracts people interested in sharing work over fluff. Which means, there is no gamification involved. You don’t get extra likes because you liked someone else’s photos, you don’t get points because you commented on a photo of a washed out family photo… which means there is less quantity and more quality.

When I saw that EyeEm had done a complete UI rewrite, I was a bit afraid to launch the app. Happily, the business model has not changed, just the buttons and navigation through the app. The developers didn’t ‘sell out’!

In the original EyeEm, you had single line lists of different photo groups, based around two tag groups of where your at and what your doing:

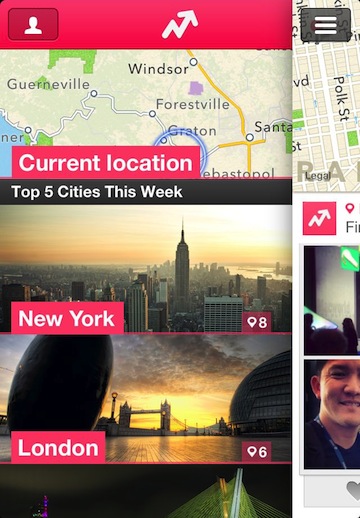
Launching EyeEm 3.0, the new app starts right off with a view of the photos recently uploaded by Friends. Notice the reduction from 5 to 3 buttons across the bottom of the screen. News access and Quick Navigation buttons are still across the top of the screen.

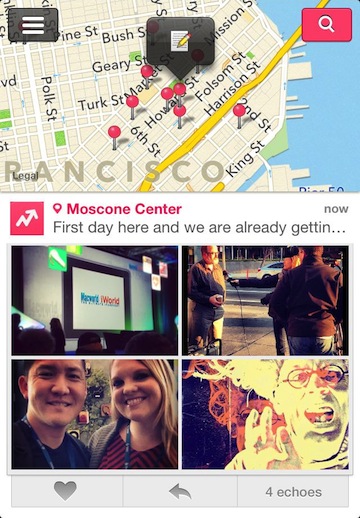
Similar to a feature very popular in Pinterest, depending on the direction of your scrolling, information on the screen changes. Scroll down and EyeEm 3.0 hides the navigation bars so you have more room to view the photos. Only the photo owner and tags show. Scroll up and the nav buttons re-appear.

The groups of photos view has lost the colored header text box in favor of the name and quantity of photos in the group information. Scrolling up/down will still take you through the groups. The less ridged look of the Discover area is a small change that creates a whole new feel. The auto hide/show of the navigation buttons happens on this view too.

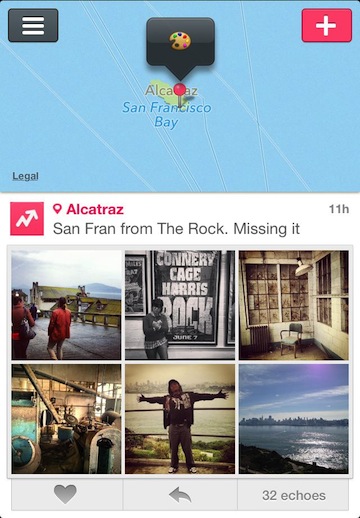
Click any group header to be taken to that area for viewing the photos specifically tagged to your interest. You can view in small thumbnails or full size views through the buttons in the upper right corner.

Settings and quick access to the different areas is via a slide out from the left – accessible via the button on the upper left corner on the Home screen. This shows the groupings of photos broken down to a particular area of interest. Note that if you use EyeEm a lot, you can go to the settings area and see/clear the cache of photos saved to your iPhone.

The ‘What’s new?’ area is still available to see the news from the EyeEm staff as well recent adds to the groups you follow and notification of others liking your photos. The layout doesn’t make it easy to see a whole bunch of people ‘liking’ your photos since the experience is about cross sharing with like interests rather than how many people tap the heart button.

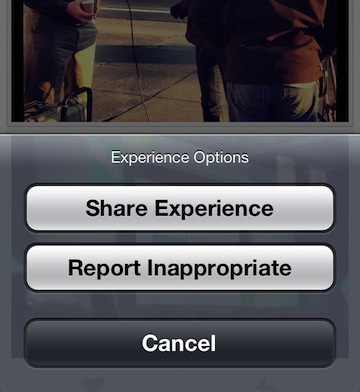
Uploading an image has not changed. Choose the camera button at the middle bottom of the screen then snap a shot or upload one from your iPhone’s photo library. There are a few filters available to use, that isn’t the thrust of the service though. When you choose to upload, you are offered the ‘what are you up to’ and ‘where were you at’ tag pickers. To cut down on having to go to other popular social sharing sites to show off your creative work, there are buttons on the screen that will post from within EyeEm 3.0 for you.

If you view your list of photo groups via the Discover button right after uploading a photo, the groups you added to will appear at the top of the list. Exiting the area and returning will have these intermixed with the rest of the areas, no longer at the top. EyeEm makes it easy to add multiple photos to an area, just go to the group via the arrow to the right of the header and add your photo.


Beware releasing your photo ownership via Terms of Service on the photo sharing sites

Just upload your photos and all of your friends can see and enjoy too. They can comment, and tell others about your fine photos. Maybe even rate, rank or purchase copies. Usually, the ability to share your photos online doesn’t require you to pay anything. Well, not any out of pocket cash, but you may be paying more in the form of ownership.

Every site that allows you to upload your photos to has a TOS that the site owners require you to agree to prior to letting you start posting. A quick glance, if you even take time to glance over the text, will show there is verbiage about you not sharing someone else’s photos as your own. What might get lost in the fine print is who owns your pictures after you upload to the site. A few friends of mine really dig into the text before they upload. I was surprised to learn about the bits they found regarding my photos being able to be used in ads without my knowledge. As well, one service that can sell copies of my photos… sharing the profit with me but not the photo credit.

Looking around for help with things in Terms of Service agreements that I should be concerned with, I found the site: “Terms of Service, Didn’t Read“. The site offers an A through E letter rating for sites across a wide range of things you should be concerned about. The site covers more than just photo sharing sites, anything with a TOS that the site has taken the time to review and rank… a lot of social and blog services are in the mix too.

An example of one site I was previously using got an overall ‘D’ rating (note the negative and positives) :

  •  Ownership
  •  The terms can change at any time
  • + The terms are easy to read
  •  Open only to individual photographers and graphic artists
  • × —– Store: your account can be terminated at any time
  •  Waiver of legal actions
  • × —- Store: Authorship
  • + Pseudonyms are allowed
  •  You are responsible for any claim and agree to indemnify them

Extract a single image from a movie on the iPhone, Using the Free app Photo Extractor

It’s a simple request, which I honestly thought was built into iOS5 on my iPhone. The ability to grab a single frame from a video I recorded with my iPhone and save it as a image. While I found the feature wasn’t built in as hoped, it can be done via the free app Photo Extractor.

Sit down, this is going to go fast! Upon launching Photo Extractor, choose a movie from the app’s library or from your iPhone’s ‘photo’ library (the app will only show videos in the library so you don’t have to sort through all the photos).

Slide your way through the video via moving the yellow box in the lower video stream image. The main window shows you what that image will be when extracted. Tap the screen or magnify glass button to have everything else disappear and the image go to full screen to be sure you have what your looking for. Then, just tap Photo Exposure’s lower right ‘Save’ button. The image is saved to your iPhone’s photo library. The screen doesn’t change so you can continue and pull out as many images as you would like without having to start over every export. The video remains intact as it was prior to starting this process.

I used a video I shot by accident (thought I had it in camera mode) in this post. Imagine if you had a party or event that you shot video at, now you can pull out photos from the video to keep. No need to watch the whole video to catch a glimpse of someone or a place. Remember that you are slicing a image out of a video though so it isn’t as high as resolution as if you had take it as a photo with your iPhone. Photo Extractor gives you a 1920 x 1080 image to work with… huge by yesteryear’s limitations.

Saving and sharing your iPhone photos via the DropBox Cloud

There is a lot of news in the area of Cloud storage this week. DropBox did an update, Google and Microsoft both released their own Cloud services. DropBox and Microsoft have free iOS apps, Google’s only current mobile solution is for the Android.

DropBox has had a automated sync-to-DropBox for photos on your Mac desktop service in beta for a while. A lot of my coworkers are using it and have all positive things to say. I’m still doing well with the Apple iPhoto Streaming service.

For those times I’m on a computer that I need access to my iPhone photos, I of course toss the images onto Cloud storage via the iPhone ‘free’ app. The recent update to DropBox means I can share my iPhone photos with people directly from the folders I have stored the photos in, even if they are not in the ‘public’ folder. Sharing the photo doesn’t give someone access to all of the photos in the folder, just the one I have granted permissions. The person can view (nice full screen viewer via a Web browser) or pull the image over to their DropBox account. They can not edit/alter the original I have ‘shared’.

All of this sharing is possible with the iPhone app. When you have the iPhone DropBox app open and viewing the photos stored online.

Selecting an image shows it in full screen view. Around the edge is a thumbnail view and share links across the bottom. The ‘access permission’ feature I’m talking about is done via the Link icon in the lower left corner.

The ‘link’ icon does more than just allow permission (via email). The DropBox app also lets you copy the access link to the iPhone clipboard to paste in notes or document as well copy the image to the clipboard to paste into documents.

iPhone photo social sharing on StreamZoo… a different experience with gamefication

Unrelated to the Instagram and Facebook deal, I do actually play with a lot of other iPhone photo sharing services. Most don’t have huge quantities of people sharing, many have very few features, and everyone has something that makes them unique.

For StreamZoo, it is about a lot of features but no requirement to use them. There are points available for posting pictures, points when people like your photos, points when someone messages you and points when you like other people’s photos. Of course there are people that abuse the gathering of points… let them.

StreamZoo has the usual overview of Popular photos, as well the ability to see Leaderboards for high points fellow StreamZoo users. A nice touch is being able to see streams of photos. Streams = Hashtags on photos. I noticed in the beginning that the majority of the posts where from Android phones, but everyone is playing nice having fun as all photos are posted equal.

Taking a photo with StreamZoo or importing from your iPhone’s photo library gives you the option to edit with filters and tuning tools. From your ‘homepage’, you are informed there are new likes or messages via the Activity button turning red.

There is badges for all sorts of things… mostly in the area of number of likes for photos you have in different streams.

All of the viewing, commenting and messaging that can be done via the iPhone app can also be done via the Web interface. Within the iPhone app, you can see and overview of your uploaded photos, information around your followers, points and quantities of uploads, streams (tags) and badges. While you can follow individuals and the photos they are sharing, StreamZoo is really more about keeping an eye on streams on a subject.

Adding a title and description for every photo can be done prior to finishing the upload. Adding tags will allow people to see the photos in Streams. Since you took the time to edit the photo in StreamZoo, you can share directly out to other social sites like Facebook, Twitter and Tumblr directly.


Update to Instagram for iPhone – changes you can really see!

The folks from Instagram (the social iPhone Photo service!) shot out an upgrade today. It’s full of what seems simple but will make a huge impact. A new filter, a new enhancement and a new UI!!

So, 2.1 includes the Lux photo enhancement. You may notice that it is very similar to Clarify in other apps I have mentioned before. It sharpens the colors and and brings the dark areas up to level with the lighter areas. There is also a new filter for your photos, called Sierra. It is a brighter, more colorful Earlybird.

Lastly, the Instagram buttons along the bottom have matured and the simplified look lightens up the whole experience. All fun stuff, looking forward to sharing my iPhone shots.