Tag Archives: iPhone tool

World Wide Garage Sale Shopping On The iPhone – No Travel Required With Stuffle

Driving down the road you see the cardboard hand written sign announcing someone’s garage has stuff in it that they want to sell. You stop to find picnic and fold up tables in a driveway, covered with a mix of household items. There will be a bar or rope strung across an opening with hanging cloths as well as a small pile of a child’s toys with a child looking on. There is no logical reasoning to the order things are on the tables but depending on what a person is looking for, a ‘must have’ item is hidden amongst a lot of worn out other previously loved items.

This is how Stuffle sees the world of people’s stuff for sale. There is no grouping or tags to narrow a search, it’s just a long table of a mixed group of items other users have for sale. Photos taken with an iPhone, then shared to the world’s garage sale table.

01 Stuffle iPhone

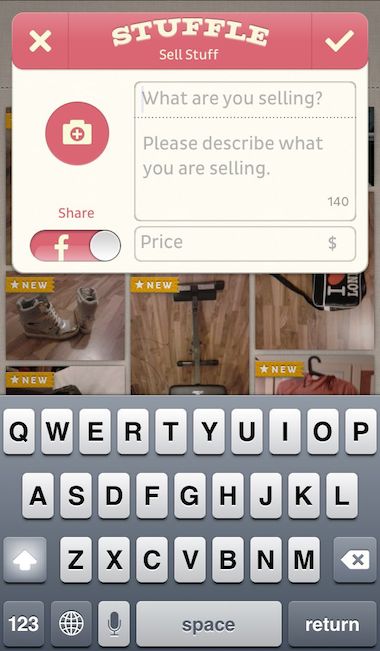
Getting started is quick and easy. Snap a photo, put a description and price on it and wait for someone looking for what you have to stumble on it. No need to worry about little sticky price tags falling off or rain to dampen the forecasted sunny weekend. Stuffle sells 24/7 with little action on your part. Of course, you will have to ship the item you sold, which is a little harder than carrying it out to the end of the driveway to someone’s car for them. The only negative so far using Stuffle for me is the lack of items for sale in the United States. Every item I have looked at so far has been in another language. I will have to see how someone reacts to my buying their discarded lamp in Germany. Fun to look at the scrolling table of things though without the pressure of the homeowner’s anxious selling eyes.

02 Stuffle iPhone

Postagram Update With More Text, More Photos and Free Postcards

What to do with all of your square format iPhone photos. Print and post mail to friends is one option, except post cards are generally not square. Postagram has been offering to print and mail iPhone photo postcards for some time now. Their way of handling the square photos is to print is on one half of the card, with cuts so the receiving party can pop the image out and use just it without the extra postcard size. I have used the solution a few times, generally more for Business Thank-You, but family members get a nice surprise from time-to-time too.

00 postagram update

The recent update to Postagram has feature enhancements throughout the app. If you tie the free iPhone app to your Facebook account, you can be reminded of birthdays in advance to get a card sent. Also, along with being able to use photos you have on your iPhone, from Instagram and Facebook, you can now also access photos stored on your Dropbox account.

01 postagram update

Normally, I pay 99 cents for the card to be printed and mailed to a US address (addresses outside of the USA are $1.99), but this summer Postagram is offering everyone 3 free postcards! As you can see, there is the addition of the large text Coppertone just above the area you enter your personalized text so it appears to be a sponsored ‘freebie’. The text area has increased in this update too, which is nice as the rest of the world keeps cutting us back to less text, shorter videos and smaller images. Thanks Postagram!

03 postagram update

Postagram is actually part of the Sincerely family of iPhone photo solution apps. On your order confirmation page, there are options to download their other apps to created gifts or greeting cards on your iPhone using your own photos. Card print/sending can be scheduled now too so you don’t have to wait to the last second to remember to send a card. Mom will thank you!

04 postagram update

Pulling together pictures that tell you about a place before you get there

Photo sharing sites have become a place for people to post photos showing what they had for lunch, the people they are hanging out with, a funny situation and a place they are visiting. While browsing around places like Instagram or Twitter, it is possible to see photos from places I have never been to. Many places are locations that I will never be able to see in person. There are other photos of places I am about to visit. The difficulty is pulling together places I’m heading to beyond doing a simple search.

A solution has shown up as a free app to use on the iPhone, called ‘Now.‘ <- there is a period in the name. The app will give you the option of viewing around you, a key city or search for another place of interest.

01 Now iPhone

The Now. location images shown appear to do not be by hashtag, rather Geotags. So, looking for a location on the map will give you photos that others have taken in that area. Unlike searching directly on Instagram where your dependent on people getting their hashtag assigned and spelled correctly.

02a Now iPhone

One instance of using Now. beyond sight seeing is an event like Macworld. Going to where the event will be or searching for the particular event by name will present all of the images posted in the area.

02b Now iPhone

The images can be scrolled through as thumbnails as well viewed larger end-to-end. The group and individual photos can be favored or shared.

03 Now iPhone

The Now. app lets you tell others about a photo (like in the case of Macworld, group photos your friends might be interested in) or to tell the system that the photo is Inappropriate.

04 Now iPhone

Choosing a picture will let you pull up the full size version. This is nice to view people, what other people have seen at the location, and in the case of a restaurant, a view of a dish you may want to order when there.

05 Now iPhone

Changing a photo’s impact using gradient fills

I was recently looking to see if there was anything new with Squaready, an app that fills around ‘not square’ photos so they can be posted to sites that require square. Looking over the developers work, I saw they did an app for applying different gradient effects to iPhone photos. Normally, I think of gradients as simply a light to dark area fill, particularly when I want an area of a photo highlighted more than other areas. Looking over the examples their app had, it got me thinking about the many other natural and un-natural enhancements that can be done to a photo.

The app, Gradgram – Fast Gradient Image Editor for Instagram, Facebook, Twitter – …. (serious, that is the apps name!) is an iPhone only app that can be yours for less than a US dollar. Uh, I still can’t get over that name.

Back to gradients. The app allows for the application of gradients colors that you choose from a picker, then apply from an area to another using a horizon or even circle areas. Then share the finished result directly out through the sites mentioned in the app’s name but also to other apps like Camera+ if you want to do additional editing. Looking over Gradgram’s examples, it gives me a few ideas to play with photos I recently took of interior rooms that would pop with the proper area shading.

01 gradgam gradient iPhone

02 gradgam gradient iPhone


1 Second video per day stitched into your life movie

For years now, people have snapped a self photo per day and stitched together into a movie. It is interesting to see how a person’s face changes over time. Some of the photos reflecting the person in casual, some dressed up, some after work and others after working out. Recently, there has been a lot of talk about little video recording devices that are either constantly or near always-on recording what is going around the wearer. I’m not thrilled about people constantly recording all around me. Sure, there is traffic and safety cameras that catch me passing by every day. I’m talking about a person sitting in a meeting or talking to me at a personal level.

A Kickstarter project just wrapped up successful with a fun marriage of the two visual recording paths above. Instead of snapping a single photo or continuious video recording, 1 Second Everyday is an iPhone app that you use to record a moment in time every day. Then, merge the short one second videos into a movie. Within a second, you have a moment in time about what is going on around the user. While not collecting too much like a conversation or too little with a single snap that can’t always be put into context. The app also allows a second of time to be pulled out of longer videos you have on your iPhone.

Although the app is inexpensive, as a thanks for the Kickstarter funding ending well, Cesar Kuriyama is offering 1 Second Everyday for no charge on Thursday January 10th, 2013. This is a 24 hour only deal. I’m looking forward to seeing how those moments come together and how the story unfolds for the viewers in the future. Whether I keep the movie private or choose to share out directly through the app.

1 second everyday

Advanced Monochrome Photo Editing on the iPhone

I have covered my fondness of the challenges of black and white photography before. There is some fun in taking color photographs and converting to black and white since not all images work in both worlds. Generally though, like using non-color film, I prefer using an app that ‘shoots’ without colors from the start.

When managing monochrome photos, I recently found an app that allows a lot of precision tuning to adjust photos for maximum effect. MonoPhix is not a filter app. It offers editing of full resolution photos on the iPhone (separate version for the iPad). I wont cover how each of the slider option impact a photo, that would make for a very long post.

You can do a lot of fine tuning with the Processing option. Changes happen to the photo in real time as you make adjustments with the sliders. Sadly, I have yet to find a way to view the image without the tuning options over the top of the image. MonoPhix has so much to offer in getting the most out of a photo though, I’m willing to work around the view shortcoming.

The Vignette effect option is on/off, then a bit of fine turning. I have mixed luck with this feature, it really depends on the photo being edited. MonoPhix seems to glow or pixelate the outer edges on some photos. Particularly if the photo already had a bit of a natural vignette effect.

For Coloring, choose the overall color from the three buttons: B&W, Sepia or Antique. Notice the box to the right of the button shows in color which option was chosen since the buttons do not show the state they are in. After choosing the overall ‘color’, use the MonoPhix sliders to fine tune further.

“Sharing” for your photos edited in MonoPhix is either saving the updated image to your iPhone photo library or out to Muzy.

The finished image is still the full size and resolution you started with.

Yes, MonoPhix has a settings area where you can decide on using high quality versus faster turn around, if you have a Retina device for previewing the edited photos, here you can turn on/off the cute tack pins that virtually hold your photo in place while editing and the overlay’s transparency.

A word of warning about MonoPhix, it has no ‘back’ or ‘escape’ when you enter a new window. If you choose the share button from the upper bar, you are going to share. Until you choose how you will share the photo in progress, you can’t escape out of the page. The only way I have found is the leave the app, double tap the Home hardware button, and remove the app from the Multitask bar. Be aware that sometime that will remove the image you have been working on too so before you go there, know how you have edited your photo so far. Otherwise, the app is proving a nice tool to get just a bit more out my iPhone black and white shots.

Snap the shot, create the product and sell… all through your iPhone

I have mentioned a few services that I use with the photos I have taken to share as well to create products for selling. One service that offers a lot of products that you can have your photos applied to is Zazzle. To help end-to-end, they offer a store you can set up where Zazzle will collect the money, assemble and ship without you having to do anything more than the initial product set up. The service pays you the percent you chose to mark up each product. Some of their offerings seem like people can get a great deal, others may appear a bit expensive and people may explore other options with no fault of your photo work.

To help their service offerings expand, and to make it easier for you to create new products, Zazzle product creation can now be done via a free iPhone app (works in 2x on the iPad). Start by taking a photo via Zazzle Instant or importing from your iPhone’s photo library.

The only placement and sizing of an image is possible on the first import screen above. Once you have chosen ‘Choose’, Zazzle Instant will automatically place the image on the product. Moving the image around a bit like you can via the Web site interface would be nice. For now, a bit of experimentation via the move/scale screen is needed to get the image placement as you had envisioned.

There is a variety of filters available to apply to you image. Sweep left/right to see each effects impact on your photo. Normally, I would have the photo edited prior to getting to the point of using Zazzle Instant, but it’s a nice feature to make sure there isn’t a small tweak to get a bigger visual impact to the finished product.

Sweeping across the upper bar takes you to other products that can have the image applied to. The list is small compared to what your able to do via the Web site, but Zazzle Instant hits all the major product types. Select one to instantly see the product with your photo on it. Since you can’t move the image around the product within the app, some photos don’t work well with some products.

When you have the product as you like it, the ‘Next’ button makes it a reality. Zazzle Instant lets you share a link with others as well add it to your own ‘Favorite’ area on your iPhone for quick reference later.

The products you create on your iPhone do not need to live in a void, they can be added to your current Zazzle account. This way, products you create on the Web site or on your iPhone will all be grouped in the same Zazzle store with your ID. The product does appear pretty quickly on your site with a default mark up and category, you can edit on the Web site to better personalize the experience without causing the product link to change.

It’s the little things that make me happy! If you choose to share the news with others of your creation, the Zazzle Instant app lets you do it via Twitter, Facebook or an email. I like that you can edit the text prior to sending, other services just fire out what always appears to be an ad for their service rather than a call to action for your followers.

When finishing up your product design, Zazzle Instant allows you to ‘Allow in Live’. This is an area that is accessed through the left ‘Live’ button. Anyone using the app can sweep through a variety of creations from other users of the app. Both for inspiration and for purchasing opportunities.


iPhone photo editor, Photo Power, updated to 3.0

Some iPhone photo editors start out looking the same, then you dive in deeper and find your first impression was right, it’s the same ol bunch of filters wrapped in a different name.

A free (doesn’t say how long it will be free) solution I was playing with this week is Photo Power. It is very much not the ‘norm’. There are very few simple filters to add, everything else is adjustable and the final result is full resolution even on the 4s!

Across the bottom of the window is Crop/Resize/Rotate, then three scrollable lists of tuning options to use with the photo. Photo Power lets you apply and undo as many as you like so you can spend a lot of time getting just the right effect or clean-up the particular photo is in need of.


In this case, there are a few ‘filter’ options given to apply. Choosing one applies the effect right away. Photo Power lets you tune the amount of the filter applied by sliding your finger left/right across the image. Note the ‘%’ for the effect being used in the upper right of the screen.

Where needed, Photo Power offers sliders to tune the enhancement application to your photo.

Yes, I am applying many different filters and adjustments to the photo without having to stop and save a copy of the image along the way.

If you know you don’t need a full size image at the end, why take the time for an app to pound through the process of working against a high resolution image. But, your output need isn’t always the same from one photo to the next. Photo Power gives you the option when starting off your editing to choose what size you will need at the end so you work with the image in that dimensions from the beginning. The small, the faster the adjustments are applied, letting you move onto the next tuning option.

The Settings is all about getting the finished product your looking for. Usually this area in other apps is filled with how to tune the camera for taking the picture. With Photo Power, the adjustments are in the area of what you expect out of the app when done. Preset your resolution as well the file type. EXIF has to be chosen if your concerned about keeping all of the meta data with the image. I used JPEG so I didn’t have to convert the image later when posting to 500px.

When the ‘save’ button is hit in Power Photo, the app sets out and applies all of the adjustments you made to create a final image. I had chosen to save the final as a JPEG using the above setting. This meant that the finished creation didn’t show up right away when I exited the app, but it did show up on full resolution after a short time.