Tag Archives: film camera

Now for something completely different, a Polaroid Film

Every day, my iPhone comes out of my pocket for a minimum of a dozen photos. Generally, many dozen images, are captured and played with with enhancement apps. The modern smartphone allows a person to take a lot of photos with near zero expense. By taking a lot of snaps of things all around, a person can learn how to judge what they see vs what will result in a photo taken. Not quite like taking photos with film. Film is pay-to-use, the roll has to be purchased, developed and printed. Which means developing photo techniques take a while. Polaroid offered a lot less of a lag between shooting and seeing a resulting image. Though, the cost of each of the instant gratification photos is considerably more.

I have mentioned before that I shoot with just about everything, all types of film in cameras across many years, for fun and profit. Last weekend was 620 and 127 films though cameras older than my dad. This weekend was a Polaroid 320 and Spectra.

Today I had a fun find, a full length movie about the last year of Polaroid. From the preview, it appears to cover the factory closure, photographers and the gent (team) that took over the equipment to produce The Impossible Project instant film. Time Zero is doing the festival rounds, with your own copy available for pre-order through iTunes. I’ll toss up a review when the movie shows up for viewing.
time zero polaroid

The classic fun of chemical processing photos brought to the iPhone

During my early 35mm film shooting days, I shot a lot to learn about the impacts of changing camera/lens settings. Rather than having to pay a local lab to process my film, I had the chemicals and a dark closet to do the work myself. Printing the negatives onto paper required equipment beyond my budget and available room in the closet. A local school and a couple kind lab owners let me use their equipment for passing light through those negatives onto special paper in a controlled environment where I mixed and adjusted my chemicals and timing of processes. That is to say, there is a lot of room for being creative when making paper prints of my film photography. Of course, now we use a lot of filters and digital tuning before sending to a printer that applies ink a dot at a time onto paper.

If you want a bit of creative fun without the smell or chance of burning your cloths, give the iPhone app Koloid a try.

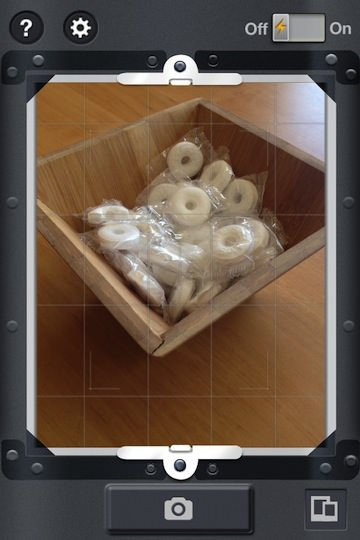
No, the app isn’t something you will start taking all your pictures with. With it’s feature limitations, the app is all about having fun being a bit unpredictable. Koloid starts with a view finder to snap the photo… options around the screen include Settings, turning the Flash on/off, Shutter and the built in Gallery. Be aware that you don’t have a big budget with the app so you couldn’t afford color paper, the resulting image will be Black and White.

01 Koloid iPhone

After you snap the shot, the first step is to adjust the collodion. The higher number will process the photo quicker but is less precise. Like, running strong chemicals and moving fast vs weaker and taking extra time to get a more detailed result.

02 Koloid iPhone

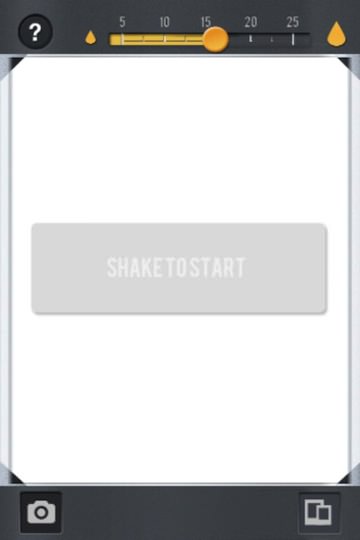
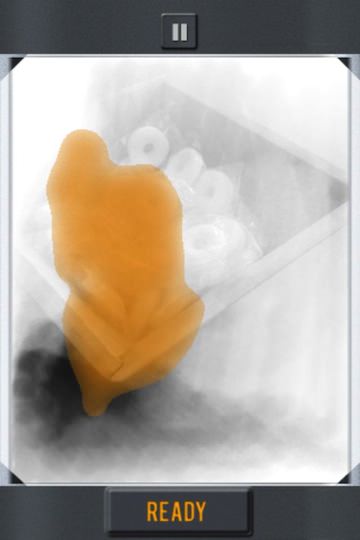
Shaking the iPhone introduces a blob of photo developers chemical. Since the iPhone doesn’t have smell-a-vision, you will need to imagine a bit of thick heavy smell to match up with the yellow area on the screen. Tipping the iPhone will cause the Koloid processing chemical to move around the white area, exposing the black and white photo.  If the chemical sits on an area of the photo too long, it will go fully black. There is no way to ‘undo’ a chemical burn on the image so use the movements smoothly to adjust the photo ‘print’ dark and light areas.

03 Koloid iPhone

Popular photo social share services are supported. Photos are saved to Koloid’s own gallery and optionally auto save to your iPhone photo library. If you want to share directly from the app, choose one of the options, add some text and send. When your done, the lower left camera button returns you to the view finder screen.

05 Koloid iPhone

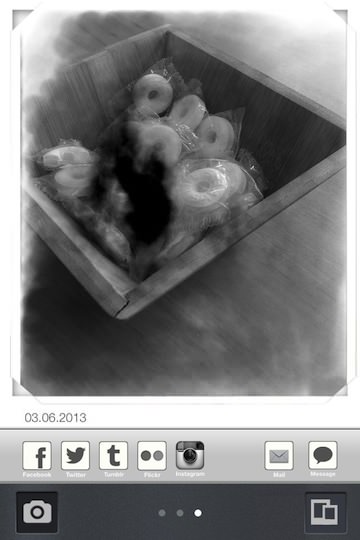
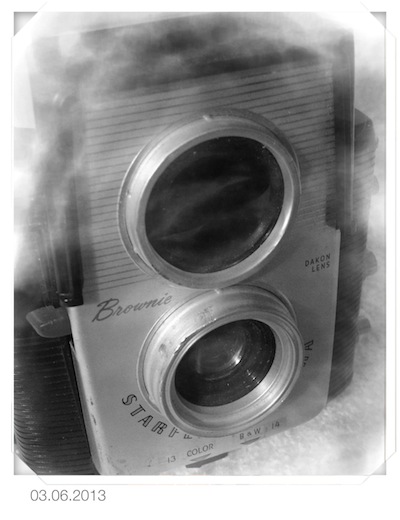
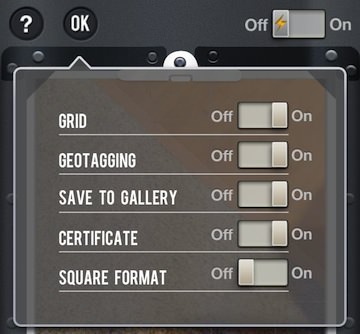
There is a settings area to decide if your shooting square photos, need a grid overlay, geotagging and more. As you will see in the final photo in the post, I have not been able to not have the date on the finished photos.

06 Koloid iPhone

Of course, your milage will vary. Below is a quick image I snapped and ‘treated’ with Koloid where I didn’t overdo any areas. Since you can’t import photos or ‘undo’, the process is very much to being down to your last piece of photo paper in the lab… the pressure is on.

00 Koloid iPhone

Multi Image Photography on the iPhone using the updated Hipstamatic camera app

Oh, here I am with Hipstamatic again. I hope you saw the Rock The Vote contest I just posted. In that same update was a big win for me via the ability to take multi image photographs. The feature is a 99 cent in-app purchase upgrade, which is the price of some stand alone apps. I’m happier to have fewer apps and more features so if the feature works well it could mean the clearing of a few other multi shot photo apps.

When the feature is installed, a new slider appears on the Hipstamatic camera in the upper left corner. When it is to the right, the camera works as it normally does. Slide it to the right to ‘disengage’ the film advance function.

When your Hipstamatic camera is in multi shot state, the slider shows the overlapping image icon in yellow. Just snap the first photo like you would normally.

The Multi Exposure slider moves across a bit to show that you are about to take a second shot over the first. If you did this double exposure by accident, you can slide it to ‘advance’ the film to a new image. I took a few shots around the house and the results where nice. I will update this post after I have spent the day around town shooting a few real life multi exposure shots. Like any Hipstamatic photography, the usability of the photo has a lot to do with the film/lens and subject combination.

Also in this update, the flash slider has grown a bit. This allows for the choice of flash styles depending on if you move it left or right.

The fun of film toy cameras on the iPhone

When I first started playing with the iPhone camera app PictureShow, I mostly used it for breaking single photographs up into multiple parts. It was a lot of fun for a couple concept photo shoots I was on then and got people thinking outside of the box.

Now I find myself using less of the fun splitting feature and more of the tools to produce the plastic camera effect. Both work very nicely in PictureShow, it all depends on the final desired image impact.

Using the pull down, you can choose to apply a long list of filters. PictureShow was one of the first apps that I really started deep diving into the effects of filters and photo tones without using a desktop photo editor.

More often now though, it’s the effects in the area of ‘style’ and ‘color’ that I tap PictureShow to help me with. As the popularity of Lomo cameras and iPhone photo sharing services increase, more people ask for photos in their designs to have a older, less tuned look.

Touch up the area around the focal point with a vignet and add a bit of noise since this picture has been sitting in the drawer for a while.

PictureShow even handles TiltShift and software HDR effects.

When the image is as you hoped, getting the image out of PictureShow has a lot of options. Share out to Facebook, Twitter or Flickr, post on a Tumblr or Blogger site, send as an attachment to an email or save to your iPhone’s photo library. The photo I edited in this post was exported at: 3265 × 2449 although you can export in: 450 x 600 px, 600 x 800 px, 900 x 1200px, 1200 x 1600 px if there is a need for smaller.


Using the iPhone to get better film based Pinhole Photographs

While my iPhone is the ‘camera’ I always have with me. I also shoot with a 16 megapixel digital, a Diana Mini and a Diana Pinhole. Since the Diana cameras are film cameras with a level of uncertainty built in, a bit more thought happens before hitting the shutter button. Film is a lot of fun, with a large variety of simple camera being available at very low prices. The film they use though is getting more expensive as suppliers lessen as well there is the cost of developing/printing. Due to this, I’m less likely to just shoot up a roll of film of anything I see like I would with a digital camera. I must say though, when film/developing was less expensive, a lot of experimentation can really help create a person’s look/feel.

A nice little app I found to make sure my Pinhole camera shots are more often usable instead of over/under exposed is Pinhole Assist. It offers a few screens of dials for you to tell the app what the environment is like, as well what film speed you have loaded and how big the pinhole (or f stop lens if you have the option on your camera). The answer you will get is how long you need to have the shutter open.

Pinhole Assist does cover a nice list of particular pinhole cameras (Diana, Holga, Zeroimage, Ilford and more), as well it has enough flexibility to be used with a camera you may have built yourself.

iPhone brings a film camera to your pocket

The days of choosing a 35mm film, a lens and the type of flash are not completely gone. While Hipstamatic doesn’t require you get the ‘f’ setting right or depth of field focus, it does offer a variety of yesteryear type choices. The output won’t be the super crisp photos of the big lens and big dollar cameras, rather it will give you the lower end experience of the bright spots and washed out colors of the not-so-perfect film cameras.

Hipstamatic comes with a variety of film types and lenses, as well a couple flash head styles. To choose, you just sweep your finger across the lens area side/side to change, and up/down to the film canisters. You can choose to use the flash or not.

You view through the little view finder window, snap your images… Hipstamatic takes a bit of time to create the image adds it to it’s own image roll. You can choose to have the photo also saved out to your iPhone’s Photo Library too. Sharing is done through the popular social services with the image including the specifics to the lens/film/flash you used. Additional film/lens combination packs are available through in-app purchase.