Tag Archives: creative photography

Creating Polaroid Like Wall Collages

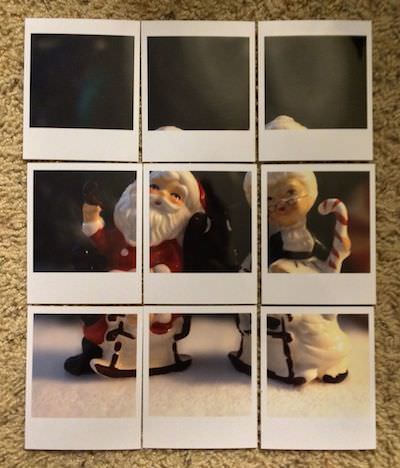
Major Polaroid fans have rows of Polaroid shots all nicely lined up on their walls. Artist create smaller collages of Polaroid photos put together to make a bigger picture, telling a story. Usually, this is done by scenes that require several photos to cover an area or a subject from different perspectives.

Not having a Polaroid camera in a person’s camera collection doesn’t mean the art can’t be done. One quick solution is to take a photo with the iPhone and split it into sections, sort of a reverse multi image collage. Instead of starting with a bunch of photos and arranging, start with a single image and cut it apart. With the holidays around the corner, snapping a photo of something seasonal will be great to use. Luckily, my wife owns a Antique shop so I have lots to grab quickly. Holiday Store window decorations are another option rather than setting up a shot on your own.

Using nSquare, I import a photo a choose how many parts I want it broken into. The app actually allows for multi photos and resizing a single.

01 nsquare

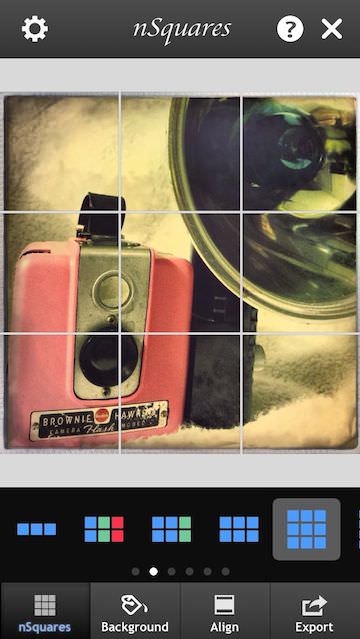
Keep in mind, this app will be breaking the photo into individual images in your iPhone’s camera roll. You can do the process twice, using the same image both times but adjusting a bit so that one square in the pattern of photo parts is slightly off ‘normal’.  Think ‘Picasso’

02 nsquare

Now that you have your bits, you can use them as they are, printing each. If your going to print your own, you may want to import the photos into the Instant app. Instant is a Polaroid app that will surround the images with the classic Polaroid frame, as well allow for adding a touch of retro finishes. Print, then trim.

If you don’t want to print, trim and cut, there is always the free app Printic. Printic offers a variety of print/mail services, the one I used for my wall art is their standard format which happens to look a lot like a Polaroid framed images.

The individual images can be stuck/pinned on the wall or clipped together and hung as a single large using. Now, looking at the below images arranged, you can see how the borders or resizing of a single image will give a more retro pop to the overall story. Remember, each frame is a separate image that can be tuned, but with nSquare, the individual images are basically cut apart for you.

03 Polaroid collage

Taking Dramatic Black & White Photographs with the iPhone

Along with the iPhone camera, I also shoot with digital cameras and film cameras. While I love being able to do many levels of modifications to my iPhone photos, I enjoy the challenge of shooting with a few Lomo cameras too. The Lomo cameras have a very limited range of adjustments (usually a couple distance settings on the lens) and additionally limited in the quality of the equipment. The lenses are not perfect and even the film advance dials mean it is easy to create double exposures through planning or through forgetfulness. The fun with the cameras are in the area of taking the challenge of what will look good and what won’t when living in the limited world.

This weekend, I was shooting around San Francisco with my nephew. Several times he stated that he was switching his Android photo to take Black & White instead of color. Hmmm… my iPhone camera doesn’t have that setting!

Enter, Dramatic Black & white, an app for the iPhone photographer. When I grabbed the app, I was hoping it was going to force the photo through the iPhone camera be taken in Black & white, but the viewfinder screen shows color. I guess, that is what the real world film camera does too. Once the photo is taken or imported, it goes black & white from there forward.

Dramatic Black & White does offer a few fine tuning options, all around the visual impact of ‘non color’ photographs. Film speed, shutter speed, lens, etc… on a film camera it all causes the finished photo to be completely different. We are about with the app though to get to the same ending, but it is all done with adjustment sliders and filters. While most ‘filter’ apps offer two or three kinds of black & white effect, this app offers three full groups. As well, lighting eclipse and fine tuning of each filter.

I will post up a few screen shots I took of the app as soon as my iPhone Photo Stream picks them up. Meanwhile, here are a few from the developer of Dramatic Black & White:

A grip for your iPhone 4 so it feels like a full size camera – Has shutter buttons too

Last year there was a project on Kickstarter (this post is not about a Kickstarter project) for a device that connected to a iPhone to make the photo taking experience more like a digital camera. A large grip with a shutter button and a related app that accepts the shutter button push to result in a photo being taken. I didn’t jump on board since the grip was larger for a firm group, cool, but I didn’t need anything that large.

Just released from Belkin is a similar device for the iPhone 4. It is far leaner in bulk, has two shutter buttons and wraps around the iPhone further up the body. It too has an app that must be open to do the actual photographing. If you do most of your iPhone photography through an app other than the built-in camera app, this solution may not fit your needs. If you take photos with the built-in camera, then enhance and tune from there, the Belkin LiveAction Camera Grip may add to your photography enjoyment. Rather than holding the iPhone by the outer edges, you can grip like a single purpose camera. There is something to be said about the feeling involved with taking a photo that adds to the feeling in the resulting image.

The free Belkin app that must be open to accept the physical shutter presses of the LiveAction Camera Grip allows for jumping between shooting images and recording video with a push of the shutter buttons. In fact, as your recording video, you can snap individual photos. There are comments that the sound on the iPhone has to be turned off when doing this action, otherwise the shutter sound is heard in the video.

iPhone Obsessed – the iPhone photography book I wanted to write!

The concept was simple, but to pull it off meant a lot of work. I set about taking photos with my iPhone and editing them with a variety of iPhone photo editing apps. I then showed the original and the final options with effects applied. It has been a lot of fun over the last year, and it has been a serious lot of work for a year.

Over the holidays, I found and purchased “iPhone Obsessed“. A book that shows finished images and the app/settings it took to get the image. The author claims it took them a year of hard work to take the photos and work through the best solution to get the effect they were looking for. Having lived a similar year, I can say I believe them. The book is a very nice item to grab (found it on Amazon here) to save yourself many hours to playing around. It is still best to experiment to learn what you can do and equally what doesn’t work. But iPhone Obsessed takes a lot of guess work out of getting to the finished result you may be looking for. It’s a great way of ‘seeing’ ideas around what is possible when you frame up a shot too.