Today I saw some chatter on the Internet about Fotor HDR. I’m a fan of well done HDR so I’m always game to see what a new HDR iPhone option has to offer. A bit of reading gave me an answer I didn’t want to see, the app uses two photos to merge. The HDR process outside of smartphones is done by bracketing three photos, not just two. With two photos being used, the impact of the final image is up to the creativity of the app developers.
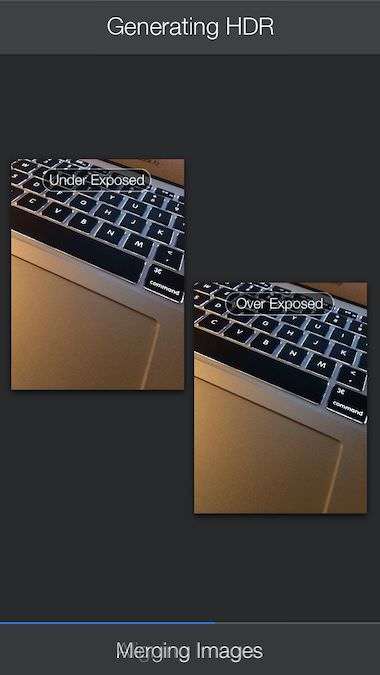
Fotor HDR starts with the option to have a grid overlay on the viewfinder to make sure photos taken individually are aligned. The app offers two shutter options. One takes photos, one after another and saved to the app’s photo folder, without stopping so nothing is missed. Or, a single shot mode that snaps two photos to merge into a single.
Take the time to visit the Settings area, there is a nice anti blur/anti ghosting switch which will help avoid the white ghost outline around objects when photos are merged by the app.
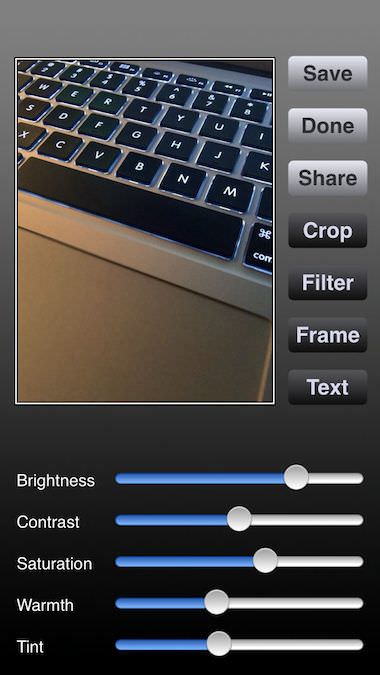
After the photos are merged, a finger swipe up/down reveals the areas of photo tuning built into Fotor HDR. Along the bottom of the screen is a row of full image filters.

Pro HDR does offer the ability to tap the screen to set the initial photo’s bright/contract spot. While Fotor HDR has a bullseye to slide around to set while Pro HDR doesn’t have an indicator of the spot chosen, just where you tap with your finger. Which can be tricky when the point being chosen is a small spot. After the photo is captures, a single page gives access to sliders to tune the overall image.
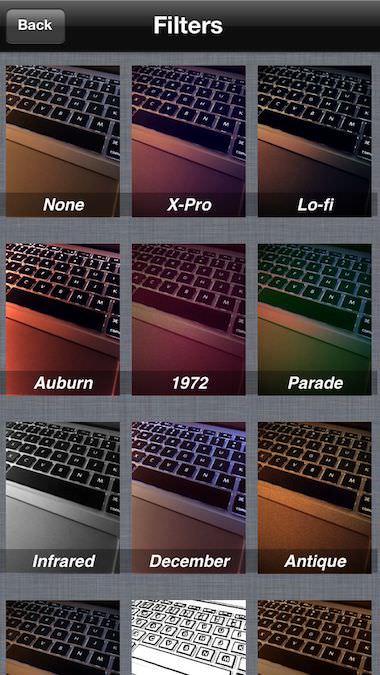
Filters are available in Pro HDR also, just a different user interface. Both solutions have a nice variety of creative named filters, neither really offer what a photographer would find as HDR adjustments on desktop photo solutions.
Here is the result of a snap taken with Foto HDR without any filters or tuning adjustments applied.

And… a shot done with Pro HDR, again without filters or tuning done. I attempted to get as close a shot as the previous. If one is taken higher than the other, the app will see the brightness of the notebook’s screen and cause the result to be different so not a apple vs apple.

I resized the two resulting photos above to fit on the page. Actual highest resolution out of the apps is:
Foto HDR 1916 x 2555
Pro HDR 2422 x 3232
Tag Archives: adjustment sliders
Advanced Monochrome Photo Editing on the iPhone
I have covered my fondness of the challenges of black and white photography before. There is some fun in taking color photographs and converting to black and white since not all images work in both worlds. Generally though, like using non-color film, I prefer using an app that ‘shoots’ without colors from the start.
When managing monochrome photos, I recently found an app that allows a lot of precision tuning to adjust photos for maximum effect. MonoPhix is not a filter app. It offers editing of full resolution photos on the iPhone (separate version for the iPad). I wont cover how each of the slider option impact a photo, that would make for a very long post.

You can do a lot of fine tuning with the Processing option. Changes happen to the photo in real time as you make adjustments with the sliders. Sadly, I have yet to find a way to view the image without the tuning options over the top of the image. MonoPhix has so much to offer in getting the most out of a photo though, I’m willing to work around the view shortcoming.

The Vignette effect option is on/off, then a bit of fine turning. I have mixed luck with this feature, it really depends on the photo being edited. MonoPhix seems to glow or pixelate the outer edges on some photos. Particularly if the photo already had a bit of a natural vignette effect.

For Coloring, choose the overall color from the three buttons: B&W, Sepia or Antique. Notice the box to the right of the button shows in color which option was chosen since the buttons do not show the state they are in. After choosing the overall ‘color’, use the MonoPhix sliders to fine tune further.

“Sharing” for your photos edited in MonoPhix is either saving the updated image to your iPhone photo library or out to Muzy.

The finished image is still the full size and resolution you started with.

Yes, MonoPhix has a settings area where you can decide on using high quality versus faster turn around, if you have a Retina device for previewing the edited photos, here you can turn on/off the cute tack pins that virtually hold your photo in place while editing and the overlay’s transparency.
A word of warning about MonoPhix, it has no ‘back’ or ‘escape’ when you enter a new window. If you choose the share button from the upper bar, you are going to share. Until you choose how you will share the photo in progress, you can’t escape out of the page. The only way I have found is the leave the app, double tap the Home hardware button, and remove the app from the Multitask bar. Be aware that sometime that will remove the image you have been working on too so before you go there, know how you have edited your photo so far. Otherwise, the app is proving a nice tool to get just a bit more out my iPhone black and white shots.

iPhone Photogs, ProCamera is on sale during WWDC
Just a quick shout out that ProCamera for the iPhone is on sale right now. The developers state that it is for the World Wide Developers Conference, which I don’t know if it mean in advance of the Monday kick off or through to the end of the event. So, if you have been thinking about grabbing ProCamera since I last reviewed in, now might be a good time.
Refresher on ProCamera. It is the app that lets you quickly get to fine tuning adjustments during the actual photography step. You can split your focus and exposure key points via a simple draggable square/circle interface. You can quickly jump to an enhanced zoom and anti shake setting so you can get ultra close ups. And, amongst many more camera features, you can zip off a bunch of photos in high speed via the Burst option. When you have the photo taken, ProCamera has a wide variety of fine tuning tools to get the most out of the images prior to saving to the iPhone’s camera role or sharing out through your favorite social sharing services.

Outside of the quick access tools via the camera view, ProCamera offers several screens list of items that you can adjust to get the tools to work the way you want them to. Choose the level of stabilization checking, turn on/off the volume button as a shutter release, adjust what additional data is saved with each photo taken, select framing for videos shot through ProCamera and to use Expert mode or not… just a few in the list to get the iPhone camera working for you rather than you adjusting to it.

PicShop iPhone Photo Editor 2.0 – with “Tons of Editing”
When I first saw PicShop iPhone Photo Editor claim to do ‘Tons of Editing”, I had to chuckle. I actually went on past the app, but then returned to take a look later. This must of course be a light weight filters application app… happy to report that it is much more. While the app offer a few common found filters, the actual more detailed tuning options are nice with their enhancement sliders and pickers. That is to say, you can customize your photos pretty quickly without getting into a full photo editor like Laminar.
After importing a photo, the areas of turning are buttons across the bottom of the screen. Each will show it’s group of effects applied to the image in the thumbnail for quick reference. The Picshop 2.0 groups include: Edits, Filters, Frames and ‘Extras’.


Like in the screen shot below for writing on the photo, PicShop offers sliders to fine tune each effect and enhancement. The changes are shown in real time then they can be applied or discarded. This allows for many different tuning effects to be used without saving and reloading an image.

Color pickers are supplied by PicShop when the choices are needed.

The variety of focus options is nice as a quick way to pull an object out or create depth.

On the ‘cute’ side, there are stickers, writing, meme, and other photo customization options that are beyond the normal filters found elsewhere. Sharing with PicShop is through email, twitter or Facebook. Saving to the iPhone’s photo library in a variety of resolutions is also supported.

iPhone photo editor, Photo Power, updated to 3.0
Some iPhone photo editors start out looking the same, then you dive in deeper and find your first impression was right, it’s the same ol bunch of filters wrapped in a different name.
A free (doesn’t say how long it will be free) solution I was playing with this week is Photo Power. It is very much not the ‘norm’. There are very few simple filters to add, everything else is adjustable and the final result is full resolution even on the 4s!

Across the bottom of the window is Crop/Resize/Rotate, then three scrollable lists of tuning options to use with the photo. Photo Power lets you apply and undo as many as you like so you can spend a lot of time getting just the right effect or clean-up the particular photo is in need of.


In this case, there are a few ‘filter’ options given to apply. Choosing one applies the effect right away. Photo Power lets you tune the amount of the filter applied by sliding your finger left/right across the image. Note the ‘%’ for the effect being used in the upper right of the screen.

Where needed, Photo Power offers sliders to tune the enhancement application to your photo.

Yes, I am applying many different filters and adjustments to the photo without having to stop and save a copy of the image along the way.

If you know you don’t need a full size image at the end, why take the time for an app to pound through the process of working against a high resolution image. But, your output need isn’t always the same from one photo to the next. Photo Power gives you the option when starting off your editing to choose what size you will need at the end so you work with the image in that dimensions from the beginning. The small, the faster the adjustments are applied, letting you move onto the next tuning option.

The Settings is all about getting the finished product your looking for. Usually this area in other apps is filled with how to tune the camera for taking the picture. With Photo Power, the adjustments are in the area of what you expect out of the app when done. Preset your resolution as well the file type. EXIF has to be chosen if your concerned about keeping all of the meta data with the image. I used JPEG so I didn’t have to convert the image later when posting to 500px.

When the ‘save’ button is hit in Power Photo, the app sets out and applies all of the adjustments you made to create a final image. I had chosen to save the final as a JPEG using the above setting. This meant that the finished creation didn’t show up right away when I exited the app, but it did show up on full resolution after a short time.
