Category Archives: Taking Pictures

Taking photographs with the iPhone

Olloclip Introduces Lens Kit with Circular Polarizing and 2x Telephoto

If you have heard of Olloclip lenses for the iPhone 4s and iPhone 5, it most likely was for their Fisheye, Wide-Angle and Macro. Their iPhone lens solution is a two sided slip over metal device. On one side is a fisheye lens, which gives a true fisheye photo over a software generated fisheye image. On the other side is a Wide-Angle lens and a Macro lens layered over each other. The lens corner ‘clip’ is a solid piece so there is one for an iPhone 4s and another for the thinner iPhone 5.

01 orig olloclip

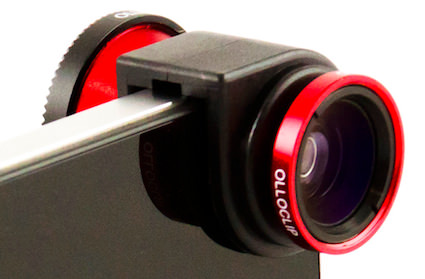
Today, I received several emails from Olloclip announcing a new version. The new solution isn’t more lenses on the original unit, instead it’s a whole new clip that carries two lenses to further expand the options for the iPhone photographer. The new Olloclip is similar in size to the original, small enough to have in my pocket without having to carry in an external case.

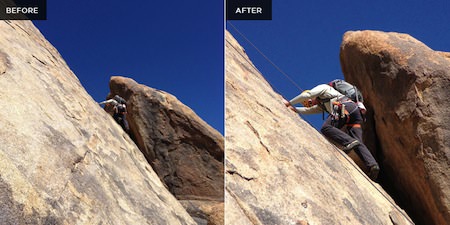
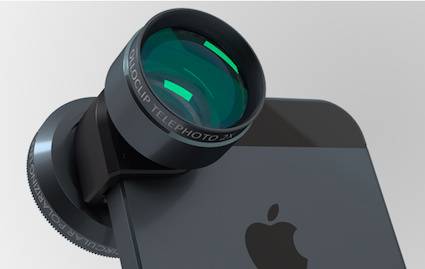
The first lens is a 2 x Telephoto. Things at a distance can be magnified by 2x with a mechanical lens, rather than the built in digital. As electronic zoom gets better at image correcting, a lens solution will make less of a difference. For now though, a lens should have a sharper image.

02 telephoto olloclip

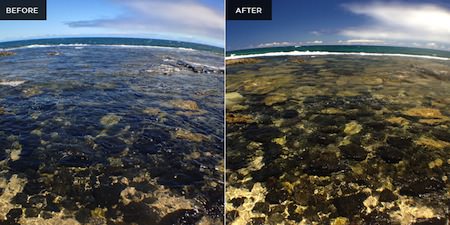
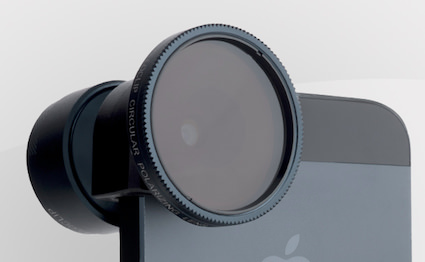
On the other side is a round Polarizer lens. While I enjoy taking reflection pictures, I have been missing the option of a polarizer. I covered in an earlier post a less expensive clip lens I use, based on their original device quality this solution should be nice. My full size cameras all have lens polarizer filters for those time I need to see through a transparent surface that could be reflecting the sky or even me!

03 polarizing olloclip

I am anxious to get my hands on one of these new Olloclip lens packs to see if it is much larger than the original. What has made the first Olloclip so usable is it can be tossed in any bag I’m carrying or even my pocket. The solid construction means I don’t worry about it getting squished like the less expensive spring clip or magnetic options.

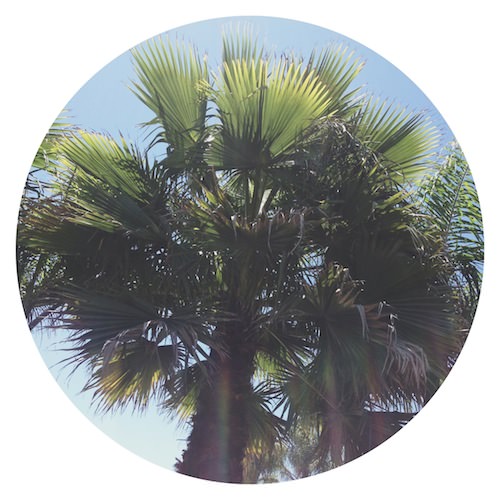
Till I have shots to show the lenses in action, here are a few from the Olloclip site.

compare1

compare3

compare4

Brighton Hipstapak introduced with Sussex Film and Doris Lens

The Hipstamatic vintage iPhone camera app has undergone several updates recently. I’ll cover lens/film sharing and working with Oggl in another post. For this Hipstapak mention, I thought I would go in a slightly different direction. Normally, I will let you know that I found a new pak available of interest for folks that like to play with lens and film combos. Then, what the folks at Hipstamatic has to say about the pak’s shooting results.

Going forward, I’ll let you know when a camera app has introduced new add-ins, as well a few shots I have done using the update in real life. I hope this helps you make a decision if the feature will enhance your photography outside of the parameters that the app provider shows.

So, like the title says, Hipstamatic now has a Brighton Pak available through the app on the iPhone. Included in this Brighton Pak is the Sussex Film and Doris Lens.

01 Brighton Hipstapak

02 Brighton Hipstapak

Below are a few shots using the Brighton combination. Since taking these photos, I’m finding the Doris lens getting used a lot with other films on the iPhone Hipstamatic app. Your preference and milage may vary.

03 Brighton Hipstapak

04 Brighton Hipstapak

05 Brighton Hipstapak

06 Brighton Hipstapak

EyeEm Social Share Updates With More Tags, Captions and Friends

EyeEm iPhone photo sharing service is up to their old tricks… adding more features and helping it’s users find others to view and share with. Kidding aside, the updates to the latest version of EyeEm isn’t about enhancing the actual photos. Instead, the service is looking for more ways people can relate through their photos. The service is one I enjoy visiting to see photos from around the world. Posts are all across the scale with street photography from a small village somewhere few of us have heard of, through to high school lunch snaps. The latest updates will help me find just what I’m interested in viewing, no matter my mood swings between visits.

After you snap a photo with the EyeEm app or import one from your iPhone’s photo library, enhance with the editing tools. Next, you can add your location with the name of the company location your at or city your in. New in this update is a step to add a caption to the photo and tagging friends to the photo.

01 eyeem upload update

The original EyeEm had you set your location then add a tag. I noticed that some folks seem to have more than one tag. The trick to add more than one tag had been to post the photo, then ‘edit’ it, adding more tags. Now, by default, EyeEm lets you add up to four tags along with your caption. Just tap the ‘add’ and start typing, a list of tags others have used will appear to choose. Or, add your own so others can start posting to that tag too.

02 eyeem upload update

iPhone photos with Rando, opposite of Snapchat, the fun of sharing and receiving

Snapchat offers you the ability to snap a photo with the iPhone and send it to a single person or a group of people. Those receiving the image in the app can view for a short, assigned amount of time and then it disappears. Other apps are known for their filters to apply to photos, prior to sharing with the public to see. Many popular iPhone photo sharing solutions encourage the building of friends to view and comment on your photos.

Rando offers a different view on sharing photos. A one to one share and receive. No importing photos, no editing, no resizing, no liking, no followers and no comments. The interface is simple and clean, as is the action of sharing and viewing photos. After verifying an email address, the app offers a round viewfinder window and a shutter button. Snap a quick shot, then decide to share by tapping the shutter again or retaking via the ‘x’ in the upper left corner.

01 rando iPhone

After a photo is shared, a short time goes by, then a Gray dot at the top of the page turns Red. Drag the screen down to view an image someone else shared. Who? No idea. If you take a few pictures quickly, each one results in Rando providing an equal amount of images back to you from others around the world. The ability to take a picture and view photos from others requires an Internet connection.

02 rando iPhone

Tap a photo to find out where the image was shared from. You can choose to not allow Location Services on photos you share, which is what I did at first. But, it appears they are only sharing a general location as fun info rather than specifics like others that pinpoint my house when I post my pup in the back yard. If you allow alerts from Rando, you will get a pop up where your photo went to and when one comes in, where it came from.

03 rando iPhone

Rando doesn’t offer any tuning of photos, a method to ID photos or specify what type of photos you want to receive. If you double tap on a photo, you will have the option to delete the photo or flag it as inappropriate. If you don’t delete, the new ones continue to add above the earlier that you can flip thought later.

04 rando iPhone

If you give Rando permission to access the iPhone photo library, full 2448 x 2448 square images will be saved. All photos round centered in a white square frame. OK… back to snapping, it’s amazing how addictive photo sharing is when there is no expectation to entertain for points or likes.

2448 x 2448


UPDATED: The Rando app was just updated (06.09.2013). Now you can swipe the list of incoming photos to see the list of photos you have submitted. Tapping a photo will show where in the world the photo was sent to. 

Analog Camera, lack of features doesn’t make an app minimalistic

RealMac Software has been producing Mac software for many years. Their first iOS app was Clear, which introduced users to a new way to interact with their iPhones in the area of Task Lists. With the exception of typing the text of the task, all actions in the app are via swipes and pinches. Clear has no buttons.

Today, RealMac released ‘Analog Camera‘, a minimalistic iPhone camera app. After a bit of time using the app to snap photos around the campus, I started questioning the line between lack of features and minimal interfaces.

Launch the app and your presented with an active view finder. There is also a row of images from your iPhone’s photo library across the top of the screen. From this starting screen, tap the shutter button to snap a square photo right away. Or, drag the screen down to select a photo previously taken for editing.

00 Analog Camera iPhone

Many posts I read today talked about how Analog Camera is a one hand iPhone camera enhancement app. Where this line of thinking slips is the feature to have a separate focus and exposure spot. To go from the default auto focus, tap on the screen with two fingers, then drag each item around the screen. This of course means you need to use a second hand to do the tapping. Perhaps, RealMac could get away from this by always having a manual focus circle in the center of the screen, tap the screen once to have a Exposure point box appear and use.

02 Analog Camera iPhone

Snapping a photo will add the image to the iPhone photo library, shown in the area above the viewfinder right away. Tap an image to be taken to the Analog Camera’s 8 filter options. 8 is no where close to as many as other apps have, but the group is slight tweaks rather than major alterations so the original photos are recognizable.

03 Analog Camera iPhone

Selecting any of the options will expand the image with filter applied to full screen. Tap the screen to return to the picker. The buttons below the image are for saving the filtered image to the iPhone camera roll, Open In to move the image to another app for further editing or using in documents, and attach to an email.

04 Analog Camera iPhone

The social share buttons appear depending on which are set up in the iPhone, between Twitter and Facebook. Though Analog Camera only takes square pics, it doesn’t feed directly to any of the other popular photo sharing services beyond the two Facebook/Twitter services built into the iOS.

05 Analog Camera iPhone

Streamzoo update lets you share your photos faster

Streamzoo is a photo social share service I have covered in detail before. It is one of the places I post and see the world via other people’s shares. As a reminder, the service leans more towards ‘streams’ that are basically hashtags, meaning the experience is a bit different from just following a long list of people.

The update this week is for letting a person post photos faster by being able to jump around the included photo edit tools. Normally, you can snap a photo, import from your iPhone’s photo library, or create a collage. After a photo is selected, the normal path takes a person through cropping, frames, filters and other enhancements.

01 Streamzoo iPhone photos

The update first shows up via the little dots in each of the options to bring in photos. Swiping across the bar changes the action of the buttons. The middle changes from importing and going through the steps, to an ‘express’.

02 Streamzoo iPhone photos

Streamzoo’s Express jumps past the edit options to the posting screen. Here you can enter a title and hashtags, or post without either. Also, pulling down on the screen exposes the photo that will be shared. Since I normally shoot and edit outside of Streamzoo, these changes mean a lot of saved time from launch to share!

03 Streamzoo iPhone photos

3 Shot Bracket Photography Comes To The iPhone with PureShot

I have covered HDR photography here before. The iPhone camera and many apps take two photos at different exposure settings and merge the images to lighten the dark and make the light areas really pop. That of course is over simplified, I’m not going for an HDR lesson in this post.

When a person finds an HDR photo on the Internet, there are three types. The basic two image merge like what is found with the iPhone’s built in camera app, there are enhanced HDR where an app is used to alter a single image for the effect and finally the images produced by a digital camera. The digital camera version usually has more natural looking lighting but everything has more vivid contrasts. The images are closer to what we see with our eyes instead of through the limitations of a smartphone camera lens unable to collect all the differences an eye can.

The digital camera version is partially due to ‘better’ or ‘specialized’ equipment… not many digital cameras have games on them or allow to be used to call mom. And, instead of two images merged, the camera captures 3 images, most common called ‘Bracketed’. The images are 3 photos taken quickly after each other so they align, but at different exposure settings. Then, via a desktop app, the photos are merged together and enhanced or cleaned up. The 3 bracket photos providing much more contrasting information to work with than only 2.

On the iPhone, app developers attempt to do the whole process of HDR so they keep it within the power of the iPhone edit capabilities, only collecting and merging two photos.

PureShot was recently updated with the feature of snapping 3 Bracket shots to be used with desktop editing software rather than being all things to all people.

The app still has more features and gadgets than the average iPhone photographer will need. But, if you are looking for more control over taking the photo and less worried about having to edit later, PureShot is the tool to be in your iPhone Camera Bag. Complete control over focus and exposure points, being able to lock both along with the focus point. The app collects a lot of data with the photo too so sharing has data that most other apps will happily use.

01 3 shot braket on iPhone

If you dip into the Menu area of Pureshot, choose  Shutter Settings, then Shutter fires, you will be given the options to have your iPhone (via PureShot, not when using the iPhone’s default camera app) capture a single image, 3-Shot Burst, or 3-Shot Bracket. Use the 3-Shot Bracket if your going after collecting 3 images for editing into a high quality HDR photo via your desktop computer.

02 3 shot braket on iPhone

Now, when looking through PureShot’s viewfinder, you will notice the addition of a ‘2’ and ‘3’ spot. Just drag those to contrasting exposure spots on the area you are going to photograph. Perhaps ‘2’ to the darkest area and ‘3’ to the brightest (don’t forget to tap the screen to focus!). When the big orange shutter button is tapped, 3 Shots will be taken with about 2 seconds between each. The slight delay allows the camera to adjust to the different exposures rather than an over all photo and attempting to fill in later. There are three small dots next to the shutter button that change from colored to blank as the three shots are taken and saved to the iPhone photo library. Now, export the three photos to your favorite HDR app on your computer and create some real bracket HDR images.

03 3 shot braket on iPhone

A solution for those times your looking for a photography idea

There is a variety of reasons to shoot photos. Something as simple as a social share or a snap at a family trip, all the way to large format art or marketing photography. To see what others are doing, for a few ideas, a person can simply wander around any of those social sites. To help pulling ideas together and offer daily challenges is an app, Photography Assignment Generator.

There are multiple versions of the app; an iPad version and iPhone version for photography ideas where your using a camera. There is also a version for iPhone photographers. Each app offers the option to choose an area on your own or have the app generate a daily challenge. I lean more towards finding shooting opportunities in the area I’m in rather than a general idea and then look for a area to match the need, so spent a couple days drilling down to particular areas.
01 photography assignment
Photography Assignment Generator will give you a daily challenge with reminders, the app will pick a challenge for the moment for you, or you can choose an area of challenges on your own. While the content is very nice, the user interface is very non-Apple. The buttons appear to be from an old Palm app and sliding the left back button results in the screen changing to the right. I do like that the whole database for the app is downloaded to the iPhone so I don’t have to worry about an Internet connection to view assignments.
02 photography assignment
Tap a category to view the challenge in that area. There are over 75 assignments which can be mixed and matched. On the iPhone version, iPhotography Assignment Generator, there is a Camera+ and Instagram Tutorial. Both are actually feature overviews of the apps, with the Instagram option having screen shots from an older version of Instagram.
03 photography assignment
Selecting one of the images takes you to a larger version of the photo and a tip for creating a similar photo. Options are available to move through the other examples in the area or close to return to the challenge. In the full version, there are hundreds of examples to gets the ideas going.
04 photography assignment

Does Albumatic have the friends photo album share figured out?

The iPhone has a camera, it has social solutions to post photos to and it many options to group photos and friends. The trick has been how to get all of the bits to come together in a way that is actually usable. Recently I was reminded of a early solution that allowed photos to be grouped by an event, it had it’s limitations around friend grouping along with a few other layout issues. In the world of apps, it was several years ago so the name has gone from my memory.

It seems everyone has made an attempt at providing a solution. Apps like Flock have ‘smarts’ built in around how and who should see the photos so there is less burden on the users. Other apps try gain usage through a unique interface for adding, sorting and viewing. It’s a huge challenge to find the magic sauce which will pull people in to use.

Albumatic is an app that has risen to being noticed not by setting new records in the number of our friends using it. Rather, in the area of the types and amount of investors that have jumped onboard to help the app grow. It’s strengths are the ability to build an album that others can be alerted to. They can then view and add their own images… which pretty much sounds like the marketing behind all of the other iPhone photo album sharing apps.

It appears from my first testing that if the album is location based, others can’t add photos without being close by. Other options are location based only by name and I ended up with pictures from other events. ‘Friends’ don’t have to be at the event to enjoy the photos, only to post (I like that). Those that are viewing (joined) the album are available via the app to the Album creator so it is easy to see who is watching along and who isn’t. Time will tell if Albumatic becomes the location photo album solution of choice. Once again, a free app that will have to pay the bills somehow once the VC money runs out, will it be location based ads?

Hipstamatic heads to Silver Lake with new lens and film pak

It’s been a little while since I have seen a new film/lens pak from Hipstamatic so this morning’s update was a nice surprise.

01 Silver Lake Hipstapak

The new Silver Lake HipstaPak contains a film and lens that gives a histaminic 126 film era result. I shot plenty of those 126 packs of film and remember too well that any bit of bright light would burn all over the final image. Now, Hipstamatic offers a 99 cent solution to get the effect when shooting the image from the start rather than the mystery of those little cartridge film cameras.

03 Silver Lake Hipstapak

04 Silver Lake Hipstapak

05 Silver Lake Hipstapak