Category Archives: Images

Photos taken and shared with the iPhone

Send a photo to a friend with the iPhone that can only be viewed for seconds

The Poke feature of Facebook has been around since near the start of Facebook. You can ‘poke’ someone like a tap on their shoulder as you walk down the hall. They have shared a brief second with you and time moves on. Why, well… not sure beyond letting someone know your thinking about them.

An app, ‘Snapchat’ took that a step further by letting you remind them that your thinking of them with a photo. Instead of just sending a text message with a photo attached, you can use the app which will limit the length of time the photo will be viewable. Perhaps it could be used to show someone a interesting thing that is happening without worrying about the photo being shared or cluttering up the recipient’s iPhone photo library.

Facebook has taken their Poke feature and made it into a free iPhone app now. You can choose to ‘poke’ someone, you can send them a photo, a bit of text or even a short video. All will be viewable for the receiving person (Facebook contact) for how long you allow and then go away.

01 Facebook Poke

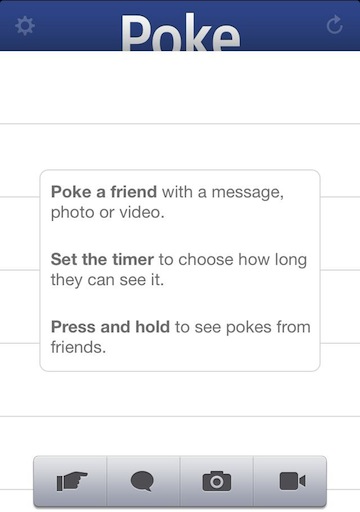
After you choose the type of ‘Poke’ you wish to send, like the photo below, you can do a little tuning and set how long the photo will be viewable to the person your sending it to. When you tap ‘Next’, you are presented with a lit of folks your connected to on Facebook allowing for one or many to be chosen. After you send, the Poke and who you sent it to is added to your list of ‘sent’. The list can be cleared if you do not want the history kept.

02 Facebook Poke

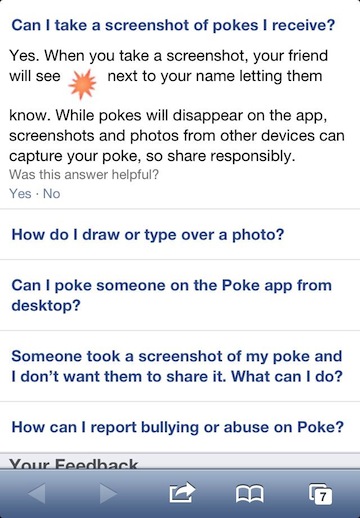
But, if someone was fast when their view a photo you send them with Poke, why couldn’t they just take a screen capture of the image. According to the ‘Help’ area, the sender gets a message that a screen capture was snapped. Of course, there are apps that record all actions when an app is open so that wouldn’t register as a screenshot. Also, they could snap a photo of the iPhone screen using a second device so don’t be misguided into sending something that could haunt you later thinking it will go away forever when Poke auto deletes.

03 Facebook Poke

It’s family holiday time, grab the Polaroid camera

Dad was an electrical engineer so we had the latest tech toys. A SX70 Polaroid fit right in, much more fun at the time than my 126 cartridge camera. Film and Flash bars were not cheap so we weren’t allowed to shoot a picture of every little thing. What really helped was the fun of the film coming out of the camera and watching the grey area of the card slowly become a ‘developed’ picture. Shaking helped the development process, speeding things up a bit as well making the color more even.

Snapping a photo with ShakeItPhoto will result in the classic film card slide onto the screen. I figured the kids I showed it to wouldn’t understand since they had never used a Polaroid camera… nah, they thought it was fun too.

It’s hard to resist not shaking the iPhone as the image starts to appear…

When the image is done, a copy of the Polaroid effect image is saved to your iPhone photo library. I found this didn’t start happening till after I restarted the iPhone. ShakeItPhoto also lets you import a image from your Photo Library to apply the effect to. ‘Sharing’ via email attachment or Facebook is available.

Options are light for ShakeItPhoto. ‘Polaroid’ is a square vs classic picture frame, Fast Processing just ‘develops’ quicker… less time to shake, Keep Original is the image without the Polaroid effect/frame.

Multi Image Photography on the iPhone using the updated Hipstamatic camera app

Oh, here I am with Hipstamatic again. I hope you saw the Rock The Vote contest I just posted. In that same update was a big win for me via the ability to take multi image photographs. The feature is a 99 cent in-app purchase upgrade, which is the price of some stand alone apps. I’m happier to have fewer apps and more features so if the feature works well it could mean the clearing of a few other multi shot photo apps.

When the feature is installed, a new slider appears on the Hipstamatic camera in the upper left corner. When it is to the right, the camera works as it normally does. Slide it to the right to ‘disengage’ the film advance function.

When your Hipstamatic camera is in multi shot state, the slider shows the overlapping image icon in yellow. Just snap the first photo like you would normally.

The Multi Exposure slider moves across a bit to show that you are about to take a second shot over the first. If you did this double exposure by accident, you can slide it to ‘advance’ the film to a new image. I took a few shots around the house and the results where nice. I will update this post after I have spent the day around town shooting a few real life multi exposure shots. Like any Hipstamatic photography, the usability of the photo has a lot to do with the film/lens and subject combination.

Also in this update, the flash slider has grown a bit. This allows for the choice of flash styles depending on if you move it left or right.

Grab your iPhone and shoot some photos for your W Magazine contest entry

Last week I grabbed the latest film/lens pack for my Hipstamatic iPhone photography app. The Pak is free right now, through the end of this month. As usual, just launch the Hipstamatic app, tap the ‘cart’ icon and you should see the pack to download to start shooting right away.

The W Mag Pak includes a nice ‘Magazine Photographer’ camera case… which doesn’t change the iPhone Camera action but maybe helps a person get into the fun of being a magazine photographer. Included in the Pak is the W40 Film and Wonder Lens, but no new Flash.

The resulting photos from the W Magazine Pak are right in line with one of my favorite photography retro look and feel.

Oh yes, the opportunity to have your iPhone photography creative work appear with the W Magazine! From the folks at Hipstamatic:

“Snap some fashion-forward photos and enter our contest for a chance to have your work showcased at a month-long, W-curated exhibition at the Ace Hotel in New York City! W Magazine will even select one overall winner to shoot a photo story for wmagazine.com. Learn more about the contest here.”


iPhone pictures of documents become scans to share

There is a couple apps from the developers of Readdle that I use. The Calendar app does a very nice job of pulling all of my different calendars into a manageable view yet allows me to quickly switch between work and personal. If you work with Google Calendars at all, Google Calendar Client helps with it’s many views.

The other app is the Readdle’s Scanner Pro. The universal app allows for the ‘scanning’ of documents so I don’t have to carry paper around and it’s easier to share with people not in the room.

No matter how ‘paper free’ an office gets, printed pages still work their way into meetings. Then I end up with a stack of paper on the edge of the desk, then it grows, then it gets tipped over, then someone asks me for a copy that used to be half way down the stack right where I left it, now… who knows. So, I started taking pictures of documents. There are a few apps that claim to help with the ‘scanning’ process, each with their own special features. Scanner Pro has been one that I didn’t jump on board with till this week, no particular reason, I thought I had documents covered.

The difference of snapping a picture of a document with your iPhone and using a ‘scanner’ app is that the apps usually offer corner ID, contrast and built in sharing. With Scanner Pro, you also get the ability to save to cloud storage/share services and joining multiple page into one document. Being able to re-order the pages in that grouping is something many of the other options seem to miss that is important, I can’t always take pictures of documents in the exact order that I need to share with others in.

Lots of fine tuning options including which cloud service your using.

Grids for alignment can be turned on/off. It is more important to get the document straight along one edge than trying to take the image so that it at a perfect straight on. Scanner Pro offers clean up for an angle image but not a slightly twisted one.

Drag the corners of the alignment square to match up to the corners of the document. Scanner Pro then shifts the image to be straightened. This is important since you will almost never get a perfect straight on shot. Without the feature, you get areas of the document with smaller and squished text than other areas.

Continue reading

Using photos taken with the iPhone on products, all created on the iPhone

I have mentioned using the free app, MoPho, to create prints using images I created on my iPhone. The app allows for iPhone photos to be printed in a variety of size, on a variety of materials and even on products like mugs and mouse pads. MoPho has been updated to version 2.0 including a whole new User Interface as well an expanded list of product types that can be created using iPhone photos.

To help promote version 2.0 you can get 10 prints for free (one free offer per person), just use code ‘10FREE‘ at checkout.

You may have noticed in the opening screen shot above, the addition of access to your Instagram photos. Below is a list of the photo size and layouts available through MoPho. Notice the two square layouts have a Instagram logo to remind you that those photos are square so they fit that layout the best. Choosing a size/shape, then a photo, MoPho will print and ship for you, all managed through your iPhone.

MoPho goes beyond printing photos, the update includes more products than the earlier version. Tapping the categories across the top bar presents images of the products (scroll up/down) in that group.

Choosing images can be a single or multiple at a time. The photos don’t have to only from the iPhone’s photo library, connecting a Facebook and/or Instagram accounts will let MoPho to use those photos to be used for products or prints too.

When viewing a product after an image have been selected, the product appears with that image on it. Sharing your work via social networks and crop/zoom/rotate buttons are across the bottom of the overview. The ‘More Info’ button provides information about the product being worked on.

Using the Crop Zoom button, you have access to the full image to resize, rotate and move. This is particularly important when dealing with a tall or wide work area where the image doesn’t automatically fit those dimensions.

Bouncing around MoPho without the need to follow the app’s path is done through a swipe on the screen to the right. This exposes the tools and area access. Another modern UI update to the app that seems natural when using it instead of hunting around for a ‘settings’ icon or being locked into an app’s workflow.

iPhone Camera Hipstamatic app updated with new Portrait Pak – also Free lens and film

A iPhone camera app Hipstamatic update means it’s time to get out and shoot with new photography effects. The app isn’t a filter post shooting app, everything is set up prior to snapping a photo.

The update to Hipstamatic takes it to version 255. The lens ‘Jane’ and the film Ina’s 1982 are now included to use at no charge. The ‘Recent’ photo area has had a redesign. And, the Hipstamatic app’s photos uploaded directly to FaceBook timeline, Twitter and Instagram can now include location tags.

Completely new for this update is the Portrait SnapPak. The in-app purchased Pak is the normal 99 cents, including a single lens and film: Foxy Lens and Sugar Film. I will get back here with an update to this post after having a few days to text the new Pak against my daily iPhone photography.

Your iPhone photography stats automatically created into an Infographic for you

If you get info on your photos you have taken with your iPhone, you can find out where you took the image, the time, if you used a flash, what app you used and much more. All you have to do is go through each photo to see that information.

Or, you can use a new app to analyze all of the photos on your iPhone and create a Infographic to show you all that data through graphic images. Photo Stats Infrographic Creator is that app which gives a fun view to that data you normally have to dig for.

The data collected is for photos on your iPhone only, in my case that is a few saved folders from trips and events, a Photo Stream (max 1000 photos) folder and the main big iPhone Photo default library

Notice the number in the lower left corner, showing that there are 11 information graphics created by me and the Photo Stats Infographic app. My part was waiting a few minutes as the app went through all of the photos, barely enough time to grab a cup of coffee! Looking at the graphic below, I need to go back and see where I was on Feb 25th!

It would appear that Photo Stats says I spend most of my time taking photos in the middle of the day. Makes sense since I shoot a lot on my daily lunch walk.

Choose the settings gear in the lower right corner to get to a few fine tuning options. Turn the circle to get to the options, the upper most is the one your adjusting. Period is for start/finish photo dates, Share is for sharing your infographic to social services, Themes has a couple options to customize the look and finally ‘View’ is how the graphics layout.

If you choose the ‘View’ option, you can have the data appear side-by-side to swipe through or all of the data stacked, which makes more sense if your going to share for others to view. Photo Stats Infographic Creator a must have app I’ll use every day? No, but it will be fun to use from time-to-time to get an overview of the photos I have on my iPhone.

Doing something with your iPhone Photographs beyond social sharing

If your like me, you take a lot of pictures with your iPhone’s camera. There are the snaps and there are those that you know are destine for more. While sharing photos with friends via social services get you pics out in front of others, there really is much more that can be done with them.

Getting your photos into galleries can be difficult, unless of course you want to pay. There are online ‘Gallery’ services that you can post you picture to. If you do nothing, your photos are in with everyone else’s. A bit of promoting and effort on your part to create your own area on those sites can be a nice showcase. The services, like 500px will allow you to license your images for people to privately use. Many even offer to handle selling licenses of your photos to larger companies that will use them for marketing and other professional services. Be aware, the license photos must be over 3000 pixels across so you will need to be uploading full resolution photos from your iPhone 4s. You can post any photos to show your abilities, the size is only a factor for licensing.

I came across an interesting opportunity Rebekah Jacob Gallery, on their site they are requesting submissions of iOS photographs to round out their exhibit.

Be a part of an exciting summer project!  July 2012, we will organize an exhibit entitled Ways of Seeing:  Phoneography.  The installation will include no more than 500 photographs.  At least 250 of the photographs selected will be by artists on our gallery roster or artists in our our broader network who we respect as professionals.  RJG is proud to open the selection process to a larger audience and launch an open submission. -Digital submission deadline, June 3, 2012 @ midnight EST -Selected submission announcement, June 11, 2012 via email – See their site for specifics.

I have covered a few apps that let you create cards and products that a company prints and sends to you. You can send for free or sell your creations. The only negative is you have to pay for inventory up front if your thinking about buying any quantity.

iPhone Photos printed on cards and mailed… for you!
Your iPhone pictures infused onto scratch resistant aluminum

A optional service you may want to look at is zazzle.com . They provide you with easy to use tool to create products with your iPhone photos. Different from the services I was talking about above is Zazzle also lets you set up a store in their system (no charge) which will sell products created just-in-time. This means you don’t have to buy any products to inventory, Zazzle just gives you a percent of all sales on items carrying your images.

More graphics and less text, 500px Stackr for the iPhone updated

You may remember my earlier mention of 500px Stackr. It is not only for viewing photos but the app also lets you upload to your 500px account directly from your iPhone. The uploading feature cut a few steps out of my busy day, yea!

The app popped up as being updated so I took a quick end to end pass through the new version. The developers have taken a app dealing with visually impacting images and made it’s self visually pleasing. Gone are the screens of lists of text. Gone is the multi taps to get to the ‘Upload’ option. Launching 500px Stackr takes you right to an overview of top images in the different group as well to easy to use buttons for actions you may also need to perform. The options are the same (except Upload being easier to get to) as the previous version’s text list, now though the options are divided into boxes/buttons with images even before you dive into the different areas.

Also changes in the overview of an individual’s image area. 500px Stackr still has their name across the top and the quick overview thumbnails down the side. Now the options have moved from thin text lines, challenging for big fingers, to larger buttons, much easier to read and touch.