Category Archives: Editing

Editing pictures on the iPhone

Mixing slow motion and regular speed videos into one movie

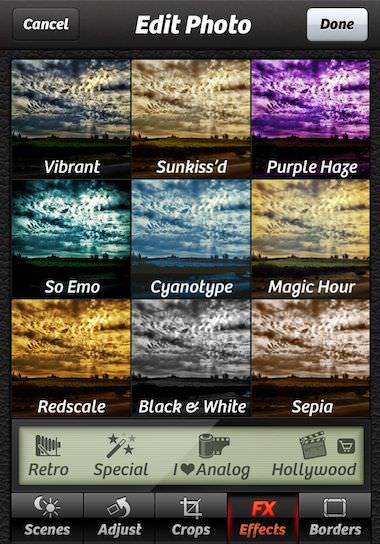
It all started with a simple single piece plastic wrap around iPhone stand. The stand was available through Kickstarter, making it easy to mount the iPhone to a tripod for those low light or self shots. The mount, The Glif, was created by Studio Neat. Since then, the team has introduced updates to the month, an big hands stylus, and even square ice cubes. Finally, iOS software.

The first app was a stop motion photography app, Frameographer. Today, I received an email to enable more creative movie creation on the iPhone. Slow Fast Slow starts off by recording video at 120 fps on the 5s, and 60 fps on the rest of the newer iOS devices. Playback can be slowed down to 1/8 speed, which is twice as slow as the 5s built in slo-mo.

Well, I know I personally have played with other slow motion apps, so that just slowing down my video isn’t that ‘new’. But, further investigation explains the name, Slow Fast Slow. Which references the apps unique power to have full control of every part of a video’s speed across any portion. When viewing a video (forward or backward), any part of the video can be slowed down a little or a lot. Imagine a video of a car zooming by, normally you have either a car streak by or take forever to get to the closest view in slow motion. Now, just choose the part when the car is closest and show down at an increasing rate till you can see the driver and car details, then speed up to zoom off.

0 slow fast slow

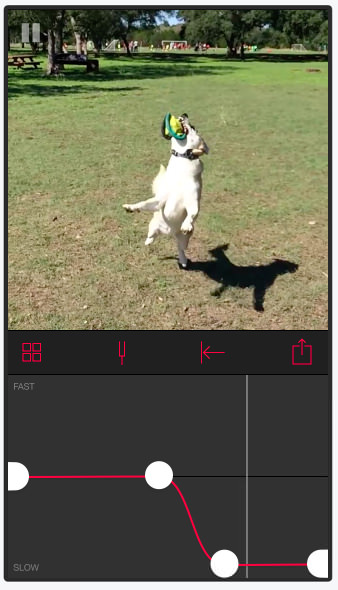
As an added bonus in Slow Fast Slow, the audio of the slowed down portion of the video doesn’t get highly destroyed like found in normal slow motion movies. There is Pitch control to level out the fast and slow bits of the video.

iPhone Photography App Update: Camera+ for the Win!

So, your favorite app, how did it handle the move to iOS7? Did the developers do a new UI to look more like the new flat OS? Where any features added? Did they release a new version you had to buy, just like the old version, but will be the only copy of the software continued to be supported?

If you use Camera+ and follow the team’s updates notes, there is always a bit of fun humor. The update released today had bug fixes, new features, enhancements to the UX and poked fun at a title that took advantage of their customers by charging again for the same app.

Camera+ for me is an app that keeps getting used. I have a nice selection of apps to do light to extensive photograph enhancements. Camera+ is usually my first app to hit since it is best at adding just a little more to a photo without going over the top. Basically, it’s the app that helps enhance the photo’s story. There are a couple additional filter packs that can be in-app purchased, but they aren’t required for continuing to use the app on a new iPhone/iPad and new iOS.

Below I have inserted a brief Camera+ UX history via screen shots. The first is the Pre-iOS7, then iOS7 slightly flattened and improved buttons, and finally today’s update with nicer example thumbnails and text overlay. Simple, yes. That is all that is needed.

One fun area of enhancements in Camera+ 4.2 is the addition of the filters that Apple now includes with their camera app. Also, higher resolution Burst Mode snaps. No extra charge!

01 camera plus iPhone

02 camera plus iPhone

03 camera plus iPhone

Oh yea… here is the text from the update. Guess who Camera+ is poking fun at for their iOS7 upgrade path.

So the previous version of Camera+ had a little bug where burst-mode shooting would crash. We fixed that.

We almost stopped there and just called it version 4.0.3, but then figured that it’d be the perfect time to boost burst-mode snaps to full-resolution on devices that could handle it (like the iPhone 5, iPhone 5s, and the unapologetically poorly-selling iPhone 5c).

That was enough to justify calling it version 4.1. And then we thought about jumping on the bandwagon where we put Camera+ out as a whole new app and let existing customers pay for it all over again. And of course there’d be the ensuing sh__storm where those customers felt cheated and we’d have to backpedal and reverse that shortsighted decision.

So it was Clear that that would’ve been a knuckleheaded move, so instead we decided to treat our lovely customers fairly and make Camera+ 4.1 a free update as we’ve always done. But then we felt like it was all give and no take… so to make us feel better about giving-in too easily, we chose to call it version 4.2. That’ll teach you to mess with us.

Then we felt bad about jumping ahead two version numbers and giving you little for your troubles. So we added a new effects pack that includes all the filters that Apple’s standard Camera and Photo apps include (for users on iOS 7). Two hours of coding (and eight trivial Core Image filters later), the Standard Effects Pack was born.

Photogene Updated To Version 4, Includes Pro Features At No Extra Charge

Photogene is one of those iPhone photo editing apps that I use a bunch, back shelf for a while then ‘rediscover’ it again. Once again using it a lot as a single app that give the ability to do all the work in one app without  silly clutter. Along with the update to the feature set in the new version 4, the app has also gone Universal so you can install it on your iPad for a larger view of your edits. The iPad interface is completely different, I’m only showing the iPhone version here.

Included in the version 4 update:

  • Photogene is now a universal app for both iPad and iPhone.
  • iOS 7 compatibility.
  • New look for iPad user interface. New icon.
  • The PRO package is now free! Everyone has been upgraded to PRO.
  • Enhanced RAW support. RAW files are now opened in full resolution.
  • Flickr export: can now choose a set.
  • New feature for exporting XMP sidecars.

Now, onto actually enjoying the power of the app – After importing a photo, Photogene 4 has a quick access tool pop up wheel to get right in and editing.

02 Photogene 4 iPhone

First off, there is a nice group of pre-built overall picture filters. These can be applied in layers when in a rush…

03 Photogene 4 iPhone

Fun overall filters that are quick and tunable. The real power of Photogene 4 though is the specific photo area tuning tools. Notice that at this level, there is also a row of fuzzy undo/redo/restore buttons along the very bottom of the screen for those times you want to throw a bunch of changes out and rethink the image.

04 Photogene 4 iPhone

Each effect can be chosen to be applied to a very specific area of the photo. Photogene lets you save/undo/cancel and move onto the next effect. So, you can brighten an area, darken another part of the photos, blur a bit, burn some light… and so on. It’s easy to move from one alteration to the next so doing simple to more detailed edits is pretty quick. When using a tool, don’t miss the ‘Options’ button in the upper area for more adjustments available for that effect.

05 Photogene 4 iPhone

Each of the effects have additional options from the dial. Usually, these start with the basic brush head used to apply the change. Choosing other tools will result in a different sub group of effects within the top level group. Notice the slider along the bottom, Photogene 4 is not an all-or-nothing filter app.

06 Photogene 4 iPhone

Every time you save adjustment, it is layered on top of the previous work. Returning to the work picker, notice that the features used have a check mark next to them. If you develop a workflow, this is handy to see where you are in the process and to assure all steps got covered.

07 Photogene 4 iPhone

When the image is as you like visually, Photogene offers the ability to adjust pixels to best fit the way you will be using the photo. As well, you can review the photo tags, then share through a large variety of options. Speaking of all-in-one without clutter, notice that you can water mark the photo without having to go to another app also… high on my list since I found a recent photo of mine on over 85 sites with no credit.

08a Photogene 4 iPhone

08b Photogene 4 iPhone

Creating Art With iPhone Photos Isn’t All Just Filters

Ready for a change? A newer iPhone photo enhancement app… that ISN’T a bunch of filters. I still enjoy using filters effectively to expand on the emotion of a photo. But, this post is about the world outside of ‘enhancements’ and more about ‘art’. An app that fits the ‘art’ from iPhone photos is Deco Sketch. For me, it’s fun, but looking at the examples there are those that can use the app’s tools to make very memorable images.

00 Deco Sketch iPhone

Deco Sketch is a geographic art tool to use on photos taken with the app or imported from the iPhone’s photo library. Art sketches are done via 10 brushes that can be adjusted for 130 different effects. The brush strokes can also be adjusted with 15 configurations. And, exporting is a full 8 MP (2448 x 3264).

01 Deco Sketch iPhone

The tools buttons are well done with little explanation needed to know what it behind them. The application of an effect is more than selecting and applying a bunch of blotches. The geographical lines apply differently depending on starting points, movement of your finger and ending point.

02 Deco Sketch iPhone

03 Deco Sketch iPhone

Choosing a different geographic option in the lower of the two rows, results in a new line of fine tuning options above it. Select one to apply. There is also a color picker to use for the lines. I found it fun to just blur the color object in the image. Below is one of the many ‘hint/tips’ that pop up when using Deco Sketch… while they can be turned off, I found them very useful to leave on.

04 Deco Sketch iPhoneUsing the magnifying glass, you can zoom in/out to get better precision. Also, using the button in the upper left corner removes all of the tools buttons for a clean work space.
05 Deco Sketch iPhoneThe finished Deco Sketch image can be shared out of the app via email, message, Twitter, Facebook, use as a photo for a contact, save to the iPhone photo library, print or ‘copy’ to open in another app.

06 Deco Sketch iPhone

Layering up your iPhone photos via Camera+ update

While there are powerful photo tuning apps available on the iPhone, talking with the tools folks around me us, they generally keep it simple. When time allows, a features of the advanced tools are great. I’m usually on the go so I hit the quick adjustment apps to bring out the message of the photo, share, and move on.

Camera+ is one of those quick go-to apps to do a few touchups without having to take a lot of time. It has a handful of full image filters and enhancements with a pre-view available to speed up choosing a path forward. While there are a few workflow adjustments I would like to make the app more efficient, it does what it promises very nicely.

This week, an update to Camera+ was introduced. There is a large enhancement to image processing flow via the addition of Enhancement Layering as well a few for-pay additions in filters and frames.

The ‘for-pay’ updates are wrapped in a new option called Hollywood. The package includes new Enhancement Filters and Frames to add the look and feel of yesteryear movies.

02a camera+ layers

02b camera+ layers

In the more robust photo editing apps, there is the option to layer effects over each other. With Camera+, until now, layering meant saving a photo with it’s enhancements, then re-importing to add another. Layers is now built into Camera+’s workflow. Allowing multiple effects to be added and adjusted quickly and easily. Well, easily when you understand where the feature is. After handing my iPhone off to several people to have them try the new feature and their stumbling around a bit, I thought I should cover the feature with a quick ‘how to’.

Like the earlier versions of Camera+, you can preview a thumbnail of any filter effect on the photo your working on (either taken with the app or imported from your iPhone photo library). Selecting a filter opens your photo in a larger view to see more detail. From this view, you can choose another option along the bottom of the screen to add ‘Scenes’ tuning, rotating, cropping and borders… or select Cancel to go back to no edits on the photo or Done to go to Save/Share screen.

03 camera+ layers

After adding an Camera+ enhancement Effect, choose the ‘Advanced’ button in the lower right corner. Along with the slider to adjust the percent of the filter being added is a new button “Add Effect”. Tap this button to be taken back to the Effects selector to choose another ‘layer’ of filter to be included with one already chosen. Buttons along the top are to through away the changes being made on the left and ‘save’ check on the right.

04 camera+ layers

Each effect chosen to be used, stacks on the previous one in the list. The tuning adjustment bar is for each effect individually, changing the photo in real time.

05 camera+ layers

Oops, that additional enhancement isn’t getting what you want? No worries, if you use the right grabber and drag the filter up to the Add Effect button, the button changes to “Drag Here to Remove Effect”, just drop it there and the filter effect is removed. I found that after I used the new Camera+ layers and the adjusters on each filter, I may want to go back and rethink some of my earlier edits. Layering is now part of the workflow since Camera+ makes it easy and quick.

06 camera+ layers

EyeEm Social Share Updates With More Tags, Captions and Friends

EyeEm iPhone photo sharing service is up to their old tricks… adding more features and helping it’s users find others to view and share with. Kidding aside, the updates to the latest version of EyeEm isn’t about enhancing the actual photos. Instead, the service is looking for more ways people can relate through their photos. The service is one I enjoy visiting to see photos from around the world. Posts are all across the scale with street photography from a small village somewhere few of us have heard of, through to high school lunch snaps. The latest updates will help me find just what I’m interested in viewing, no matter my mood swings between visits.

After you snap a photo with the EyeEm app or import one from your iPhone’s photo library, enhance with the editing tools. Next, you can add your location with the name of the company location your at or city your in. New in this update is a step to add a caption to the photo and tagging friends to the photo.

01 eyeem upload update

The original EyeEm had you set your location then add a tag. I noticed that some folks seem to have more than one tag. The trick to add more than one tag had been to post the photo, then ‘edit’ it, adding more tags. Now, by default, EyeEm lets you add up to four tags along with your caption. Just tap the ‘add’ and start typing, a list of tags others have used will appear to choose. Or, add your own so others can start posting to that tag too.

02 eyeem upload update

Your iPhone photos printed to Polaroid like paper frames

As I mentioned at the beginning of the Stickygram article, there are a lot of printing service options for your Instagram photos. While this solution prints square photos, they aren’t limiting you to just those uploaded Instagram services images. The service, Printic, offers a free iPhone app to gather and adjust your photos. Then, for 99 cents each minimum of 3, they will print and mail for you. I tried the service with a few for a friend who isn’t on Instagram rather than back to me.

Printic requires an Account Setup, then offers access to choose a photo from the iPhone photo library, Instagram and Facebook.

01 printic iPhone

Selected photos appear in a running bar across the bottom of the page. Selecting the ‘pencil’ icon in the lower right corner pops up Edit tools for each picture. Printic allows Cropping, Quantity, Text and Delete.

02 printic iPhone

One of the popular things to do when sharing a Polaroid (and a feature found in most imitation Polaroid creating apps) is ‘writing’ a short message on the open box area below the photo. Printic offers this as well.

03 printic iPhone

When your done editing the photos, add your payment information, then where you will be sending the photos. It is optional to have the photos sent to multiple addresses so Printic could be a creative way of doing invites or announcements too.

04 printic iPhone
I always wonder about the licensing a company has to do in order to create apps and services which allow printing to a photo frame that mimics a Polaroid. Polaroid took the time to big shoe me when I had artwork on CafePress for sale which had a Polaroid in the corner of the image. They stated that they own all representations of the frame.

iPhone Photography Apps Trending Towards Huge Lists Of Up Charges

Interesting that I originally started taking notice of so many in-app purchase options with the app KitCam, which has now been discontinued.

App creators are looking for ‘better’ ways of making a profit. Initially, everyone was making their millions from charging 99 cents and selling many many copies. Then there was the twist towards iAds everywhere in the app which has had mixed results for app sellers. Most recently is the push to start charging more for apps to move them into the world of ‘real software’. Pricing for iOS apps closer to their desktop counterparts.

Hosted solutions and apps that require online support are limited to apps that can use that feature. They carry a monthly/yearly charge for the developer to maintain access to your data across multiple devices. With many services going under and the app becoming useless without, these may be feeling a crunch of concerned buyers. Currently though, more apps are going the direction of free or minimal charge for the app, then anything but the very basic features will cost more. ‘Enhanced’ filters for photo editors or ‘brushes’ for drawing apps, all just a dollar more and then another dollar more.

I have no doubt that this pricing scheme of encouraging people to buy another add on works, a long time success story is Hipstamatic where new new Packs are introduced throughout the year. Most just show a group of lenses and film packs, with a descriptive name that an individual can buy to get that extra special effect for their photos. The drawing app Paper has additional brush tips and color mixing for those more creative drawing folks, and those that wish more options might make them a better at drawing.

The up charging does work for apps for bridging between basic users and the more advanced. There are those that seem to hook a person in with a low up front charge then charge for what a person would think are ‘basic’ supported features.

A few examples of both:

01 in app feature upcharing

02 in app feature upcharing

03 in app feature upcharing

04 in app feature upcharing

05 in app feature upcharing